Internal and external hard disks, including partitions connected to the Ubuntu PC, should get automounted, meaning they should be accessible after the system startup without having to go to the file manager to mount manually.
For some reason, if it’s not happening automatically by default settings, there is a fix for it. Let’s take a quick look at the steps needed.
Automounting hard disks and partitions in Ubuntu
This guide is tested to be working 100% in Ubuntu 18.04, but you should have no problems in Ubuntu 17.10 and above.
Step 1) Go to “Activities” and launch “Disks.”
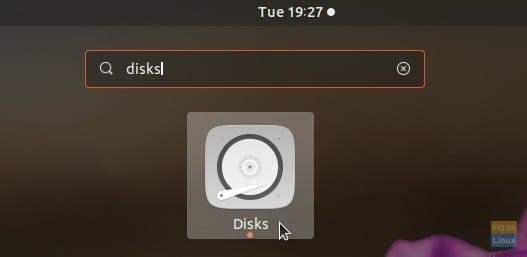
Launching Disks from App Menu
Step 2) Select the hard disk or the partition in the left pane and then click on the “Additional partition options,” represented by the gear icon.
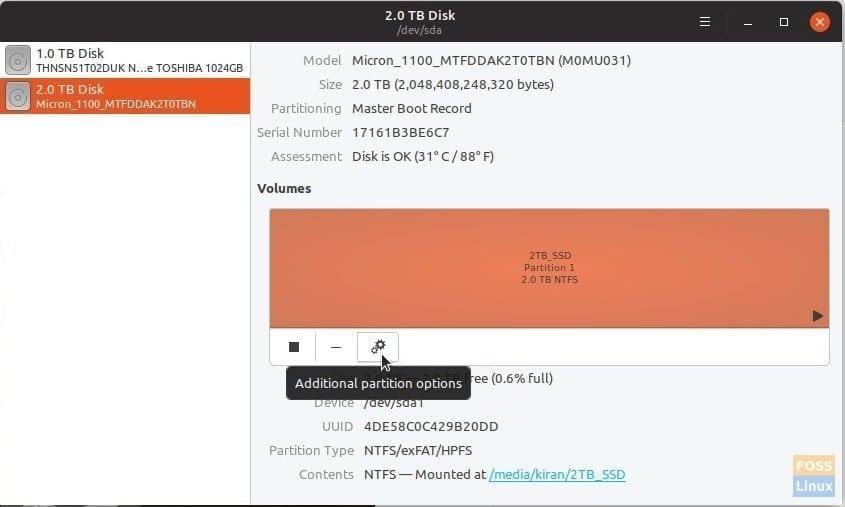
Hard disk Settings
Step 3) Select “Edit Mount Options…”.
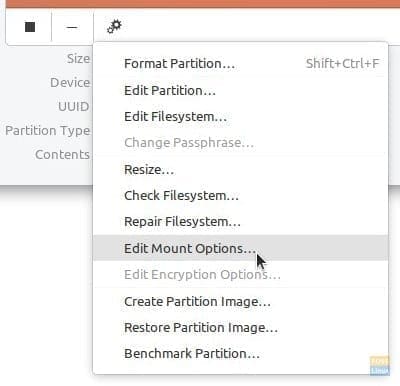
Partition Settings menu
Step 4) Toggle the “User Session Defaults” option to OFF.
Step 5) Check the box “Mount at system startup.” Make sure “Show in the user interface” is also checked.
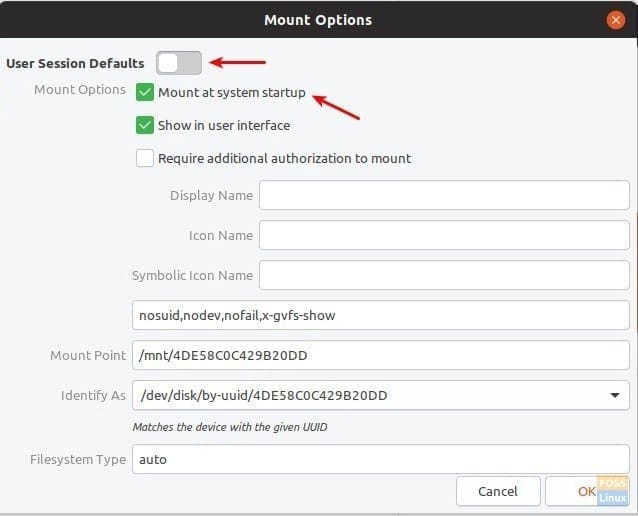
Partition Mount Options
Step 6) Click “OK.”
That’s it. Next time you boot the computer, you should see the partition automounted.
Adding additional authorization to mount
If you wanted a layer of security and would like to set up authorization for mounting a hard disk or a partition, you can do that too from the “Disks” utility.
While in the “Mount Options” menu, check the box “Require additional authorization to mount.” You must enter a password to complete the setup.
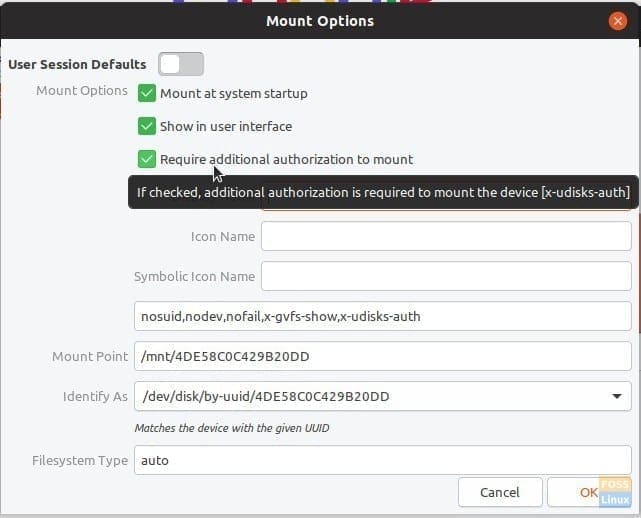
Mount Options – Setting Authorization
Note that this authorization is only applicable to non-administrators of the PC. Admin users will be able to mount the partition without needing to enter the password. This also means that if there is only one account in your PC, which implies it’s that of the administrator, this setting does not affect.

16 comments
How about xubuntu?
sudo apt install gnome-disk-utilty
Does not work for encrypted drives on 18.04.1. It really annoys me as this worked perfect in 16.04. I have my steam library on a second drive and now that it don’t automount anymore Steam ain’t able to locate my library before I first open Files, select “Other locations” and then click on my drive. And all has to be done before opening Steam. It’s so annoying as it worked flawlessly on 16.04 :/
I’m so happy, figured out why it did not work!
For anyone else having trouble…
Follow the guide as above, but you have to do this additional step:
– In the Mount Options click “Identify As” and select the line that starts with “LABEL=”
If you want to do it manually, here’s a copy of my etc/fstab line for reference:
LABEL=Mydisk /mnt/Mydisk auto nosuid,nodev,nofail,x-gvfs-show 0 0
(replace “Mydisk” with the name of your mounted drive)
Works flawlessly for me again!
This wont work
Hello Friends,
my desktop on 18.04.2 LTS died an untimely death. It had one separate 1 TB HDD (‘MyFiles’) as backup. It was not automounted. I used to manually mount when required. I removed this HDD and plugged through USB 3.0 adapter on my new Dell desktop with factory installed Ubuntu 16.04.12 LTS. It is showing mounted, but displayed ” This location can not be displayed. ** You do not have the permission necessary to view the contents of ‘MyFiles’.”
Can you please tutor me how to own back this HDD on my current desktop?
Best wishes. Hug and love. 🙂
P.S. The HDD is on ext4 and has no partition.
Kiran what do you mean by “activities” in Step 1) Go to “Activities” and launch “Disks”.?
I find no menu in Ubuntu 18.04 called activities nor is the command “activities” recognized on command line.
What is this? Something you installed?
help me in Ubuntu 18.04.3 LTS. Thank
Recently i installed on my new laptop which have SSD drive, Endless OS 3.7.3. Later I put my old llaptop SATA HDD and formatted it. But I turned out that every time I had to enter my password to work with it. The above guide helped me solve the problem. Now I open Files and i have access to the disk, and without any problems I saving in it any information. Thank You Kiran Kumar!
This solved an annoyance for me on Debian 9 with the MATE user environment. Even though MATE doesn’t have an “Activities” menu, I was able to start the Disks utility from the Run button on the panel, or by typing “gnome-disks” in a terminal window. Thereafter, procedures were the same as described in this article. Now the second hard drive auto-mounts and I don’t have to keep mounting it manually, supplying the root password each time. I also changed the mount point from “/mnt/a6d0a81c-292d-4d76-8cf6-7c5a5752fcde” to “/mnt/drive1” so that it is easier to refer to the second drive in scripts. To make it easier to identify in the GUI file manager, I gave it a meaningful, short name in the “Icon name” box, too.
I did it but after that i couldn’t delete folders on mounted volumes.How can i fix it ?
As far as I know, the volumes come protected. You have to make use of chmod and change permission of the mounted volumes.
Does automounting the HDD increase battery consumption? I think my laptop battery is consuming faster these days (after automounting HDD (the swap,EFI, root, and home are in SSD)). And its fan turns on a little more. Could these be due to enable automount?
Is it possible top do this with hdds or partitions encrypted with luks?
I am running Ubuntu Server 22.04 headless vis ssh in Raspberry 4, can’t mount USB hdd with luks encrypted …
Is there a solution?
Honestly speaking I have learnt a lot from this website, and will keep learning more. Huge thanks to the author of this site.
it’s working thank you