GParted Partition Editor is one of the best programs to create, resize, and manage hard disk partitions. The greatness of free and opensource program is it can be used to work on Linux, Windows, or Mac OS X.
It supports all the popular hard disk formats, including btrfs, ext2 / ext3 / ext4, fat16 / fat32, NTFS, and more. In this article, I will explain how to make a bootable GParted live USB drive, which can be used to resize and partition any hard disk.
Why a GParted live USB drive?
If you are wondering what’s the need to create a GParted live USB drive when you can install GParted on your Linux distro. The problem is you can’t resize an active partition from which you have booted your computer. By using a GParted live USB drive, your hard disk is free to use, and you can have the freedom to resize and partition easily.
Creating a GParted Live USB drive on Ubuntu
STEP 1: Download GParted Live ISO from here. There are 32-bit and 64-bit versions available.
STEP 2: Insert a blank USB flash drive to your PC. I recommend a minimum of 512 MB capacity. The USB flash drive will get formatted during the process. So make sure you took a backup of the data in it.
STEP 3: Launch ‘Disks’ utility. ‘Disks’ come packaged in Ubuntu and Linux Mint by default. Elementary OS users can download it from the AppCenter for free.
STEP 4: Select the USB flash drive in the left pane of the ‘Disks’ window and then click on the ‘Navigation’ icon located on the right side. Select ‘Restore Disk Image…’.
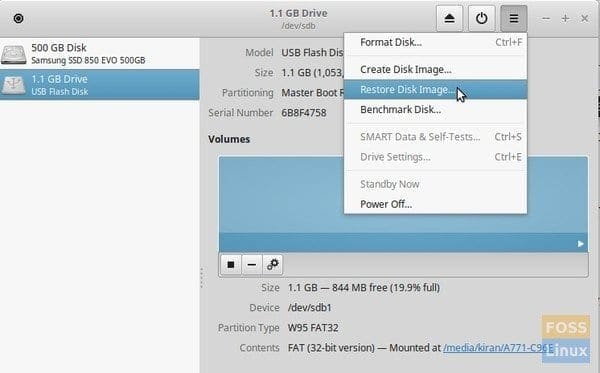
Restore Disk Image
STEP 5: Browse and select the GParted Live USB ISO file, which you had downloaded in STEP 1.
STEP 6: Click ‘Start Restoring’.
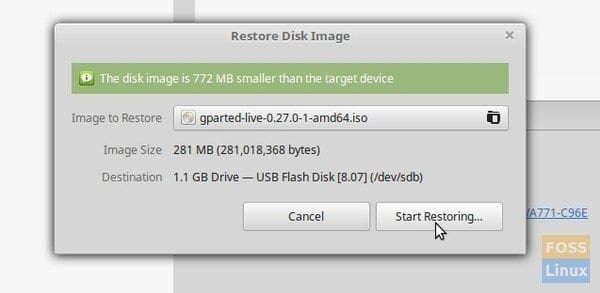
Start Restoring
STEP 7: Confirm and enter the root password.
That’s it. Your GParted Live USB drive (also called GNOME Partition Editor) is now ready! You can boot into it right away to resize and partition your hard disk.
Boot into GParted Live USB drive
1. Once you boot your computer into the USB live drive, you will see this window. Select the first option (highlighted by default) and hit the enter key.
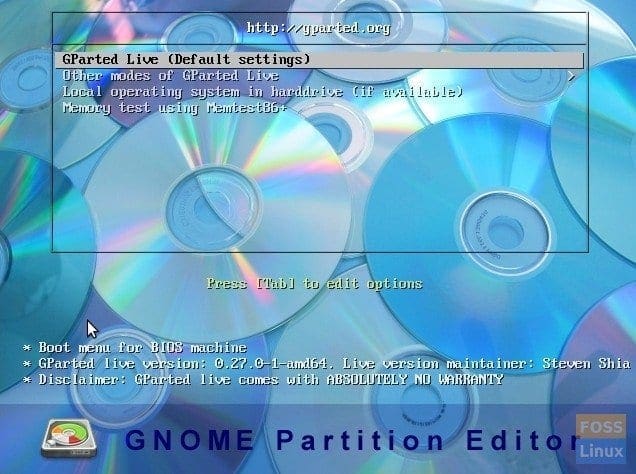
GParted Live
2. In the next window, select ‘Don’t touch keymap’ and hit enter.
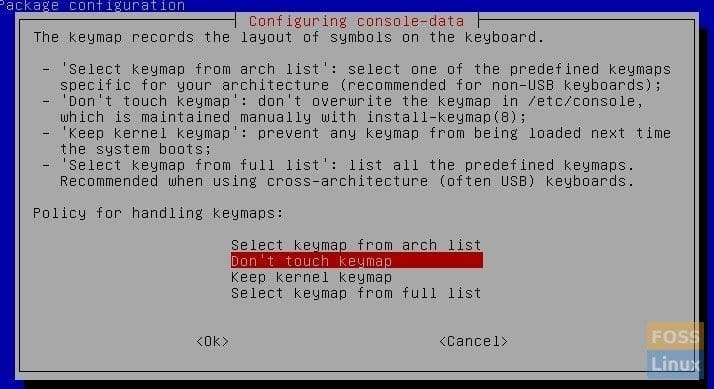
Select Don’t touch keymap
3. Enter language #.
4. Finally, you will see the GParted user interface. You can select the desired partition and resize/create/format partitions.

GParted User Interface
Enjoy!

5 comments
Hi Kiran,
This is very simple and useful step by step 🙂
Thanks
hi kiran….
u r doing a grt job….keep it up..
m new to linux and started falling in love with it.
Thanks. I enjoy your facebook page and the news letter. Easy to follow and create the bootable USB that I needed.
I’m new to Linux, and I’ve used resources provided by you a couple of times now. You do a great job, thank you for your dedication.
This was really helpful! I have my USB ready, but I’m unsure on how to boot my computer into the USB drive. I have an Asus Vivobook, and it’s running Ubuntu 20.04