Even the most dedicated fan must admit that certain aspects can be a bit tedious in Linux, such as dealing with expired GPG keys. While it’s a vital component for ensuring our systems’ security, it can sometimes put a damper on our productivity.
In this post, I will walk you through the process of managing expired GPG keys in Linux package management, exploring the importance of GPG keys, how they can expire, and the steps needed to update or replace them. Along the way, I’ll also share some personal insights and preferences, as well as include some essential subtopics to help you better understand and navigate this aspect of Linux package management. Let’s get started!
Why GPG keys are important
GPG (GNU Privacy Guard) keys play a vital role in ensuring the integrity and authenticity of packages in Linux package management systems. They allow us to verify that the packages we install come from trusted sources and haven’t been tampered with. I can’t stress enough how crucial this is in maintaining a secure system, especially considering the increasing number of cyber threats today.
How GPG keys can expire
GPG keys have a predefined expiration date, which is usually set by the key creator. The expiration date is a security measure to prevent long-term exploitation of compromised keys. However, this means that we, as users, need to stay on top of updating our keys to avoid issues during package installations and updates.
Understanding GPG key updates: Automatic vs. manual
A question I often hear from fellow Linux users is whether GPG keys need to be updated manually or if it’s taken care of by the system updates. The answer is: it depends.
In many cases, GPG keys for official repositories are updated automatically through system updates. When your Linux distribution releases a new version or pushes a security update, it usually includes updated GPG keys for its official repositories. This ensures a seamless experience for most users, as you won’t have to worry about expired keys when using the official repositories.
However, for third-party repositories or custom-added repositories, GPG key updates might not be handled automatically. In these situations, you’ll need to update the keys manually when they expire. This is particularly true for software that comes from smaller projects or individual developers who may not have the resources to implement automatic key updates.
In my personal experience, I’ve found that staying on top of GPG key updates for third-party repositories is a necessary part of using Linux. While it can be a bit inconvenient at times, it’s essential for ensuring the security of your system.
Overall, GPG keys for official repositories are typically updated automatically through system updates, while third-party repository keys may require manual intervention. It’s always a good idea to be aware of the repositories you’re using and their associated GPG keys, so you can take action when needed.
Identifying expired GPG keys on your Linux system
Knowing how to check for expired GPG keys on your Linux system is essential in ensuring a secure and smooth package management experience. In this section, I’ll walk you through the process of detecting expired GPG keys related to software repositories in Ubuntu and other Debian-based systems, which can help you stay ahead of potential issues.
List all GPG keys: To see all the GPG keys currently in use by your system, run the following command:
sudo apt-key list
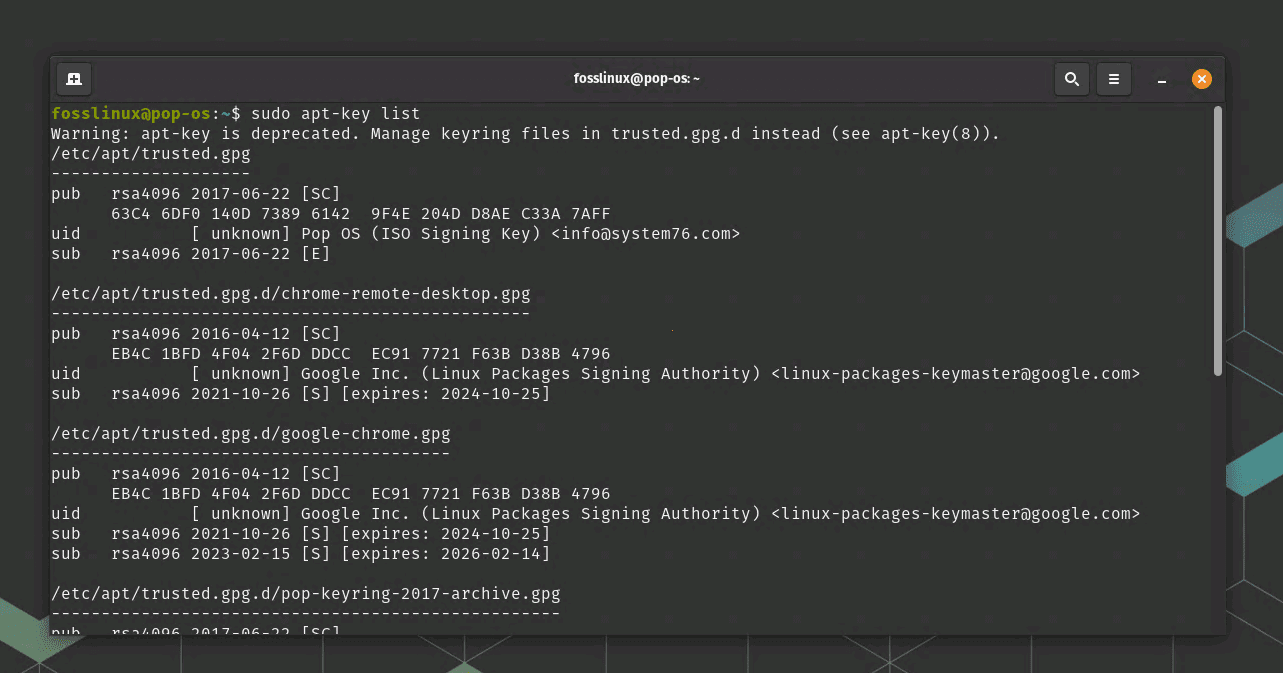
This command will display a list of all the GPG keys, along with their associated information, such as key ID, fingerprint, and expiration date.
Check for expired keys: As you review the output, pay close attention to the expiration dates. Expired keys will be marked with the text “expired” next to the expiration date. For example:
pub rsa4096 2016-04-12 [SC] [expired: 2021-04-11]
1234 5678 90AB CDEF 0123 4567 89AB CDEF
uid [ expired] Sample Repository <sample@example.com>
In the below example on our Pop!_OS system, there are no expired GPG keys as of now.

Displaying GPG keys in Pop!_OS
Take note of expired keys: If you find any expired GPG keys. GPG key IDs can be either 8 or 16 characters long, depending on whether they are short or long key IDs. Short key IDs are the least significant 8 characters of the key’s fingerprint, while long key IDs consist of the least significant 16 characters.
Regularly checking for expired GPG keys on your system is a good practice to maintain a healthy package management environment. By proactively identifying and addressing expired keys, you can avoid issues related to package installations and updates. As a Linux user, I’ve found this to be a valuable habit that helps me keep my system secure and up-to-date.
Now that you are aware of everything about GPG keys, let me show you how to update expired ones manually.
Updating expired GPG keys
When updating an expired key, you can use either the short or long key ID, as long as it uniquely identifies the key on the keyserver. However, using the long key ID is recommended for better security, as short key IDs have a higher risk of collision.
To update the expired key using the long key ID, replace KEY_ID with the long key ID:
sudo apt-key adv --keyserver keyserver.ubuntu.com --recv-keys LONG_KEY_ID
Replace LONG_KEY_ID with the actual long key ID of the expired key.
As you can see, we are using an Ubuntu keyserver. That might flash a question in your mind. Can I use Ubuntu key server for my non-Ubuntu Linux distro, for example, Pop!_OS?
The answer is yes; you can use the Ubuntu keyserver to update expired GPG keys for Pop!_OS. Pop!_OS is based on Ubuntu, and it shares many of its repositories and package management infrastructure. The Ubuntu keyserver hosts GPG keys for Ubuntu and its derivatives, including Pop!_OS.
However, keep in mind that if the expired key is related to a specific third-party repository or a custom-added repository not associated with Ubuntu or Pop!_OS, you might need to use a different keyserver or obtain the updated key directly from the repository’s maintainers.
I must confess, I’ve often found that key servers can be somewhat unreliable, so you might need to try a different key server or retry the command a few times.
Verify the updated key: After successfully importing the updated key, you can verify it with:
sudo apt-key list
I always take a moment to double-check the key information just to be sure everything is in order.
Update your package information: With the updated key in place, you can now update your package information by running:
sudo apt update
I find it satisfying when the update process finally goes through without any GPG key errors.
Additional tips
Backup your GPG keys: I highly recommend creating a backup of your GPG keys, as losing them can be quite problematic. Use the following command to export your keys to a file:
sudo apt-key exportall > ~/gpg-keys-backup.asc
Check key expiration dates: It’s a good practice to occasionally check the expiration dates of your GPG keys using sudo apt-key list. This way, you can anticipate and address any potential issues before they disrupt your package management.
As Linux package management systems evolve, some changes have been introduced in the way GPG keys are managed. Understanding these changes can help you manage your system’s keyring more effectively.
Understanding the differences between gpg –list-keys and the deprecated apt-key list
The deprecated apt-key list command
apt-key list is a legacy command that was specifically used for managing GPG keys related to software repositories in Ubuntu, Debian, and other Debian-based systems. Running this command displayed GPG keys stored in the apt keyring, which were used to authenticate and verify packages from repositories during package updates and installations.
However, since Ubuntu 20.04 and Debian 11, the apt-key command has been deprecated in favor of storing repository signing keys in individual files located in /etc/apt/trusted.gpg.d/. As a result, the apt-key list command may not display a complete list of keys on newer systems, and using the new gpg command is recommended.
The new gpg –list-keys command
The gpg –list-keys command is used to list all public GPG keys in a user’s GPG keyring. It is a general-purpose command that can be used to display keys for various applications, not just package management. The output includes key IDs, fingerprints, and associated user IDs (names and email addresses). To list private keys, you can use the gpg –list-secret-keys command.
This command has become the recommended way to manage GPG keys as it focuses on individual user keyrings and offers a more versatile approach to key management. But having said that, since this is a new system, it’s possible that you gpg –list-keys command doesn’t display anything on your system.
If gpg –list-keys doesn’t display any output but apt-key list shows a list of keys, it means that the GPG keys in your system are being managed differently for general purposes and package management.
When you use gpg –list-keys, it lists the public keys in your user’s GPG keyring, which is intended for general usage, such as email encryption, file signing, or other applications that utilize GPG for security.
On the other hand, apt-key list displays the GPG keys that are specifically related to software repositories in Ubuntu, Debian, and other Debian-based systems. These keys are stored in the apt keyring and are used to authenticate and verify packages from the repositories during package updates and installations.
In summary, the two commands list keys from different keyrings:
- gpg –list-keys lists keys from your user’s GPG keyring, which is used for general purposes.
- apt-key list lists keys from the apt keyring, which is used specifically for package management.
If you see keys in the output of apt-key list but not in gpg –list-keys, it means that you have GPG keys related to package management in your system, but you don’t have any general-purpose GPG keys in your user’s keyring.
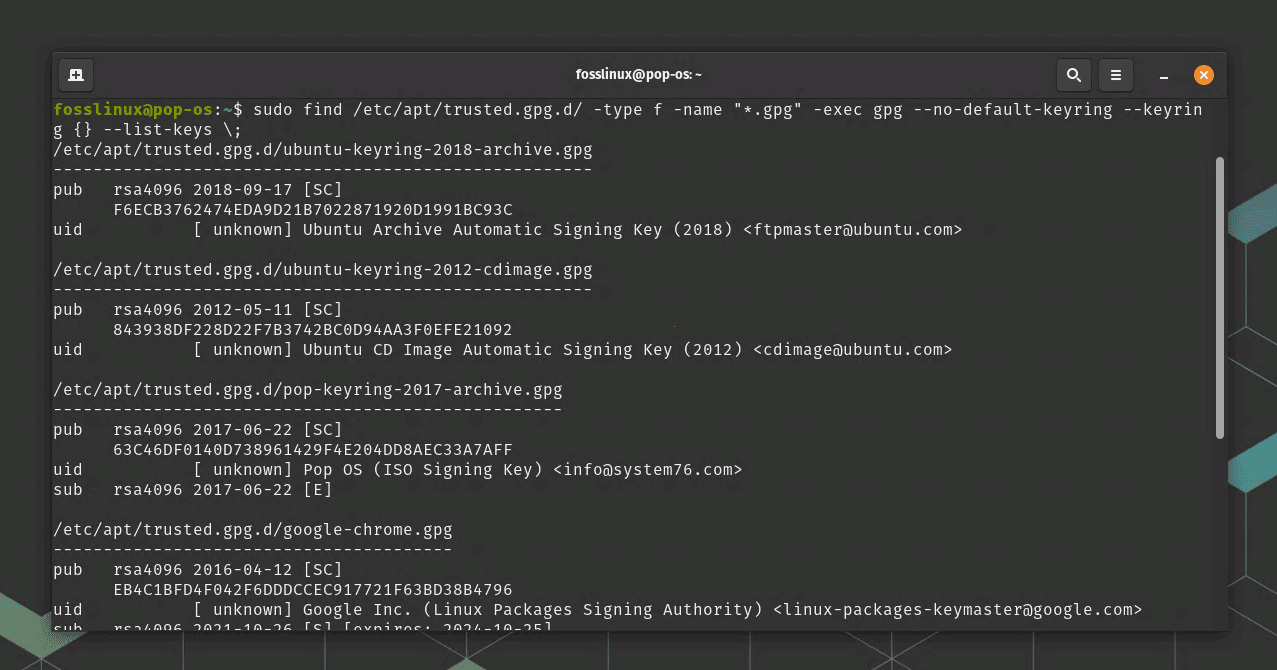
Since the apt-key command is deprecated since Ubuntu 20.04 and Debian 11. On newer systems, repository signing keys are stored in individual files located in /etc/apt/trusted.gpg.d/. To list the keys for package management on these systems, you can use the following command:
sudo find /etc/apt/trusted.gpg.d/ -type f -name "*.gpg" -exec gpg --no-default-keyring --keyring {} --list-keys \;

Finding GPG keys in newer Linux distros
This command uses find to locate all .gpg files in the /etc/apt/trusted.gpg.d/ directory and then passes each file to the gpg –list-keys command using the -exec flag. The gpg command is executed for each file, displaying the keys stored within.
Conclusion
Dealing with expired GPG keys is an integral part of Linux package management. While it can be somewhat annoying, it’s essential for maintaining a secure system. By following the steps outlined in this article and adopting some best practices, you can minimize the impact of expired GPG keys on your workflow. As a Linux user, I’ve come to accept this as a small price to pay for the benefits and control Linux offers. Happy package managing!

