I remember the first time I had to transfer a file from my local machine to a remote server – I was a bit intimidated, but it turned out to be a lot simpler than I expected. Now, I’m hoping to make it just as easy for you.
SSH (Secure Shell) is a fantastic protocol that enables secure communication between two systems over an unsecured network. One of its most popular applications is remote file transfers. In this blog, we’ll explore two popular methods of transferring files over SSH: SCP (Secure Copy Protocol) and SFTP (SSH File Transfer Protocol). Let’s dive in!
Uploading files to a remote system over SSH
Step 1: Prepare your computer that receives the file
If it is a Windows PC: Enable OpenSSH on Windows
Enable the OpenSSH server on your Windows PC.
- Press Win + X and select “Apps and Features”.
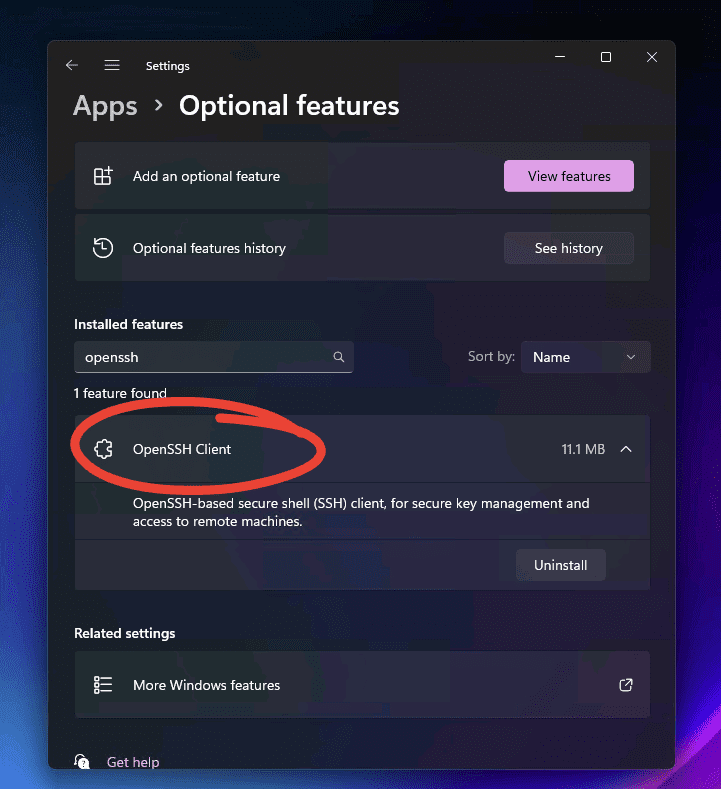
- Click on “Optional Features”
- Look for “OpenSSH Server” is already installed. If not, click “Add a feature”, find “OpenSSH Server” in the list, click on it, and then click “Install”.

OpenSSH Client already enabled on Windows 11
Determine the IP address of your Windows PC
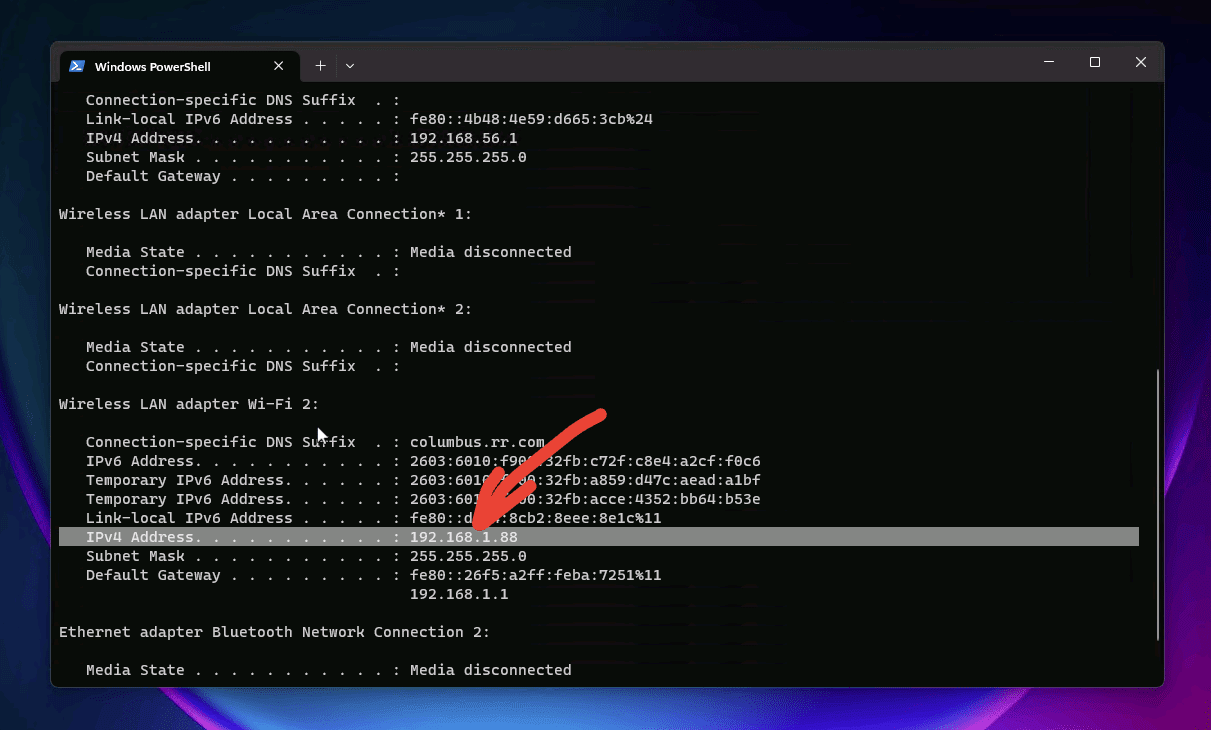
- Press Win + X and click on “Windows PowerShell”.
- In the PowerShell window, type ipconfig and press Enter.
- Look for the “IPv4 Address” under the network adapter you’re using (Ethernet or Wi-Fi). Note this IP address, as you’ll need it in the SCP command.

If it is a Linux PC: Ensure OpenSSH is installed on the destination Linux PC
On most Linux distributions, the OpenSSH server is either pre-installed or can be installed easily. To install the OpenSSH server on the destination Linux PC, open a terminal and run the following command:
For Debian-based systems (e.g., Ubuntu, Pop!_OS):
sudo apt-get update && sudo apt-get install openssh-server -y
For RHEL-based systems (e.g., CentOS, Fedora):
sudo dnf install openssh-server -y
Determine the IP address of the destination Linux PC
- Open a terminal on the destination Linux PC.
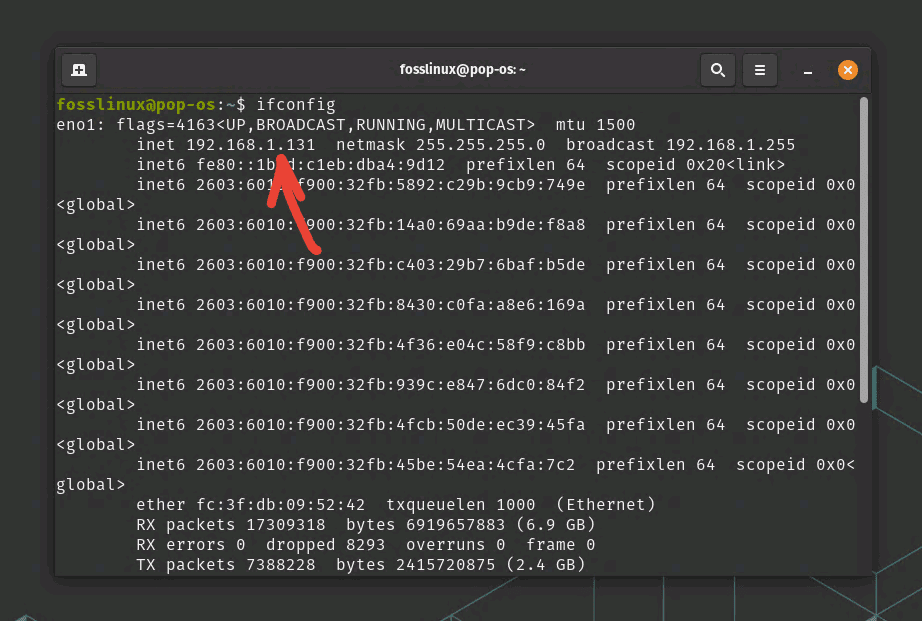
- Type ip a or ifconfig and press Enter.
- Look for the “inet” (IPv4) address under the network adapter you’re using (e.g., eth0 for Ethernet or wlan0 for Wi-Fi).
- Note this IP address, as you’ll need it in the SCP command.

Now, getting into actual file transfer methods over SSH, we have two ways:
Method 1: SCP (Secure Copy Protocol)
SCP is a simple command-line tool that allows you to transfer files between two systems using SSH. It’s been my go-to method ever since I stumbled upon it during my early days in web development. It works on Linux, macOS, and Windows (with the help of third-party tools like PuTTY).
Step 1: Install an SSH client (if needed)
Most Linux and macOS systems come with an SSH client preinstalled. If you’re on Windows, you can use PuTTY, a free SSH client, or enable the OpenSSH client that comes with Windows 10 and later.
Step 2: Open a terminal
To use the SCP command, you’ll need to open a terminal window on your local system. On Linux and macOS, you can search for “terminal” in your system applications. On Windows, you can use the Command Prompt, PowerShell, or a third-party terminal like Git Bash.
Step 3: Prepare the SCP command
The general syntax for the SCP command is:
scp [options] [source] [destination]
- options: Any additional flags you want to use (optional)
- source: The local file or directory you want to transfer
- destination: The remote system’s address and desired path for the transferred file
For example, if you want to transfer a file called fosslinux_log_sample.txt from your Linux system to a remote server, your SCP command might look like this:
scp /home/fosslinux/FOSSLinux_log_sample.txt username@remote-host:/Users/user/Desktop/
Replace user with your username on the remote system, and remote-host with the remote system’s IP address or domain name.
Step 4: Run the SCP command
Run the SCP command you prepared in Step 2 into the terminal window and press Enter. You will be prompted for your password on the remote system. Enter your password and press Enter again.
Step 5: Monitor the transfer progress
Once you’ve entered your password, the file transfer will begin. The SCP command will display the progress of the transfer, including the percentage completed, transfer speed, and estimated time remaining.
Step 6: Verify the transfer
When the transfer is complete, you can verify that the file was uploaded successfully by logging into the remote system via SSH or SFTP and checking the destination directory.
Step 7: (Optional) Transfer directories
If you want to transfer a directory instead of a single file, you can use the -r (recursive) flag with the SCP command:
scp -r /path/to/local-directory user@remote-host:/path/to/destination-directory/
This command will transfer the entire directory, including all subdirectories and files, to the remote system.
And that’s it! By following these steps, you can use the SCP command to upload files and directories to a remote system over SSH.
Method 2: SFTP (SSH File Transfer Protocol)
SFTP is another command-line tool that allows for secure file transfers over SSH. It’s more versatile than SCP and supports additional features like resuming interrupted transfers, directory listings, and file permissions management.
Step 1: Connect to the remote system via SFTP
To establish an SFTP connection, use the following command:
sftp user@remote-host
Replace user with your username on the remote system, and remote-host with the remote system’s IP address or domain name. You’ll be prompted for your password.
Step 2: Transfer files with SFTP commands
Once connected, you’ll see an SFTP prompt (sftp>). Use the put command to upload a file to the remote system:
put local-file.txt /path/to/destination-directory/
To transfer a directory, use the -r flag:
put -r local-directory /path/to/destination-directory/
When you’re done, exit the SFTP session with the exit command.
And that’s it! Now you know how to upload files to a remote system over SSH using both SCP and SFTP. I hope this tutorial has been as helpful to you as it was for me when I first discovered these methods. In my experience, I’ve found that SCP is great for quick file transfers, while SFTP offers more functionality and control, making it ideal for managing files on the remote system.
Bonus: Graphical SFTP Clients
For those who prefer a graphical interface, there are numerous SFTP clients available that provide a user-friendly way to transfer files over SSH. Some popular options include:
FileZilla – A free, open-source, and cross-platform FTP, SFTP, and FTPS client.
WinSCP – A popular Windows-only SFTP, SCP, and FTP client.
Cyberduck – A user-friendly and powerful file transfer client for macOS and Windows.
These applications typically provide drag-and-drop functionality and make it easy to manage files on both your local and remote systems.
Common troubleshooting tips for uploading files to remote systems over SSH
1. Check network connectivity
Ensure that the local and remote systems are connected to the network and can communicate with each other. You can use the ping command to test the connectivity between the two machines.
2. Verify the SSH connection
Before attempting to transfer files, test the SSH connection between the local and remote systems with the following command:
ssh user@remote-host
If you can’t establish an SSH connection, there may be a problem with network settings or the remote system’s SSH server configuration.
3. Ensure OpenSSH is installed and running
Verify that the OpenSSH server is installed and running on both the local and remote systems. If not, follow the instructions in the previous sections to install and enable OpenSSH.
4. Check permissions
Make sure that the user account you are using for the transfer has the necessary permissions to access and modify the source and destination directories.
5. Inspect the source and destination paths
Ensure that the source and destination paths specified in the transfer commands are valid and formatted correctly. Double-check that the paths use the appropriate syntax for the respective operating systems.
6. Use verbose mode (if available)
For transfer methods that support verbose mode, such as SCP, use the -v flag to get more detailed information about the transfer process. This can help you identify potential issues and guide you in troubleshooting the problem.
7. Check firewalls and security settings
If you are unable to establish a connection or transfer files, check the firewall settings on both the local and remote systems. Ensure that the appropriate ports (usually port 22 for SSH) are open and not blocked by any security software.
8. Update your software
Ensure that your operating system and software are up-to-date. Updating your software can resolve known issues and improve the performance and security of your file transfers.
By following these troubleshooting tips, you can resolve common issues encountered when uploading files to remote systems over SSH.
Conclusion
Uploading files to remote systems over SSH can be a straightforward and secure process when following the appropriate steps. By ensuring proper network connectivity, verifying SSH connections, and utilizing the correct transfer methods, you can efficiently transfer files between local and remote machines. Keep in mind the troubleshooting tips provided in this article to address any potential issues you may encounter. Remember that assistance is always available, and don’t hesitate to reach out if you have any questions or need help with any aspect of file transfers or SSH connections.

