I‘ve been a Linux user for well over a decade now. Having been through the wringer of different Linux distributions, from Debian to Arch Linux and RPM-based systems, I’ve learned a thing or two about managing disks. Today, I’d like to share with you one of the tools: the fdisk command.
The fdisk command is a text-based utility for viewing and managing hard disk partitions on Linux. It’s one of those powerful tools that I’ve learned to respect and handle with care. After all, with great power comes great responsibility, right?
Understanding fdisk
The fdisk utility is a robust tool, and it’s no exaggeration to say that it can be your best friend or your worst enemy. It can help you partition your disk, change partition types, and even delete partitions. But if used incorrectly, it can lead to data loss. That’s why I’d like to spend some time ensuring we all understand how to use it safely.
What is fdisk?
fdisk is a classic command-line utility in Unix and Unix-like operating systems such as Linux. It’s used for disk partitioning and provides a wide range of options for managing disk partitions.
Now, I know what you’re thinking: “Why on earth would I use a command-line tool when there are graphical tools available?” That was my initial thought, too. However, I’ve found that the flexibility and control provided by fdisk, not to mention its ubiquitous availability on nearly every Linux distro, make it worth learning.
Using fdisk to check hard disk in Linux
Before we dive in, it’s important to note that you should always back up your data before making any changes to your disk partitions. I can’t stress this enough, and it’s a lesson I’ve learned the hard way.
Checking the list of disks
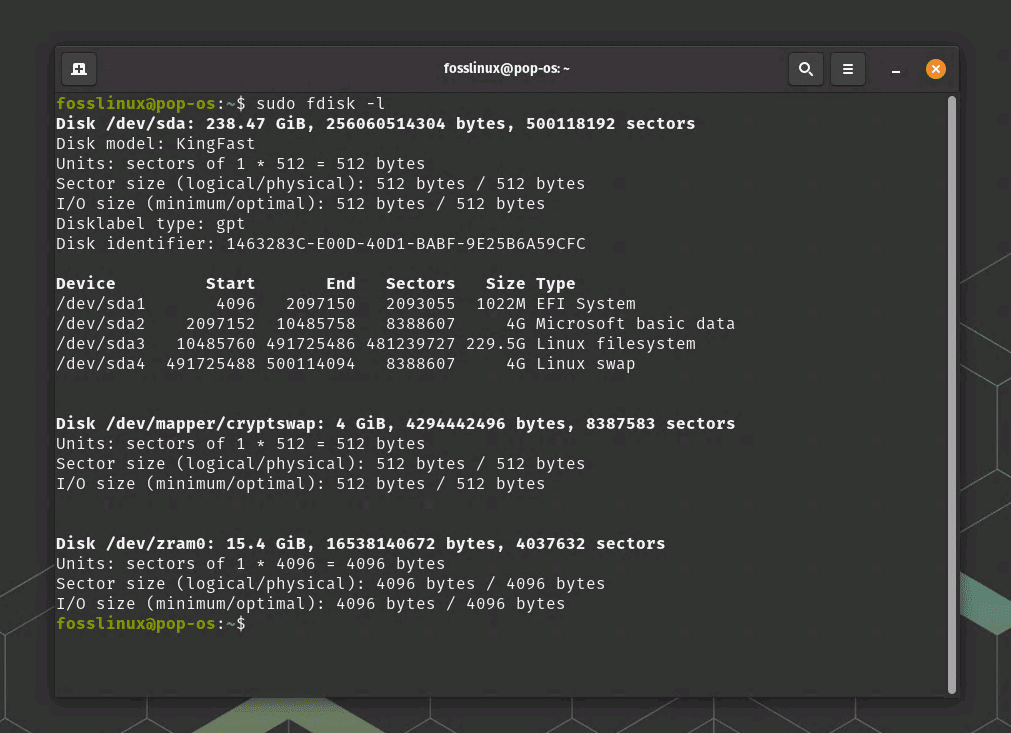
To start with, open your terminal. Remember, most operations with fdisk will require superuser privileges, so you’ll likely need to use sudo. Let’s start by checking the list of disks attached to your system:
sudo fdisk -l

fdisk command usage
This command will list all the partitions of each disk. You’ll see the disk name, size, number of sectors, and partition type.
Working with a specific disk
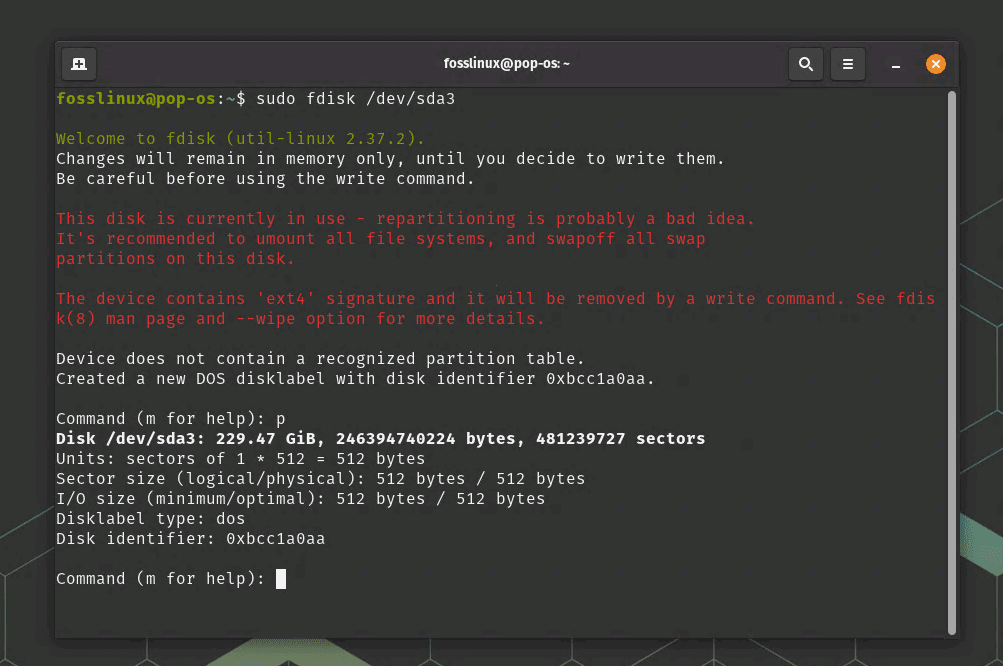
Let’s say you want to work with a specific disk, for example, /dev/sda3. You can do so using:
sudo fdisk /dev/sda3
This will open the fdisk utility specifically for the /dev/sda3 disk.
Navigating fdisk’s command-line interface
Now, this is where things can get a bit tricky and where I’ve previously had some headaches. The command-line interface of fdisk is not the most intuitive, but with a little bit of patience, you’ll get the hang of it.
Now that you have opened the fdisk utility for a specific disk, you can use various commands to inspect and manage the disk partitions:
- p: Print the partition table for the disk. This command will display detailed information about the partitions, such as the partition number, start and end sectors, size, and file system type.
- m: Show the help menu. This command will provide a list of available commands and their descriptions.
- q: Quit fdisk without making any changes.
To display the partition table for the disk, press p and then hit Enter. To exit the fdisk utility, press q and hit Enter.

fdisk usage
Differences across distros
While the basic use of fdisk remains the same across distributions, there are slight differences you might encounter depending on whether you’re running a Debian-based, Arch Linux, or RPM-based system.
Debian and Ubuntu
On Debian-based systems like Ubuntu, the usage of fdisk is pretty straightforward, and the commands listed above should work just fine. Debian-based systems have always seemed to me like the friendly neighborhood of the Linux world, where things just work more often than not. However, like all Linux distributions, you need to ensure your system is up to date:
sudo apt-get update
sudo apt-get upgrade
Arch Linux
Arch Linux, on the other hand, is a different beast altogether. It’s a minimalistic, DIY kind of distro, and it’s one that I’ve had a love-hate relationship with. While it’s immensely satisfying to build up your system from scratch, it can be a bit more demanding.
On Arch Linux, you might need to install util-linux to access fdisk. You can do this with the pacman command:
sudo pacman -Syu util-linux
Then, you can proceed with the fdisk commands as discussed earlier.
RPM-based systems (Fedora, CentOS)
RPM-based systems like Fedora and CentOS follow a similar approach to Debian for managing packages. To ensure your system is up to date, use the following command:
sudo dnf update
After that, the fdisk command should work as expected. I’ve always found RPM-based systems to be a sort of middle-ground between the ease of Debian-based systems and the granular control of Arch.
Other useful fdisk commands
Before we wrap up, I want to share a few other fdisk commands that I’ve found useful over the years.
Checking disk space
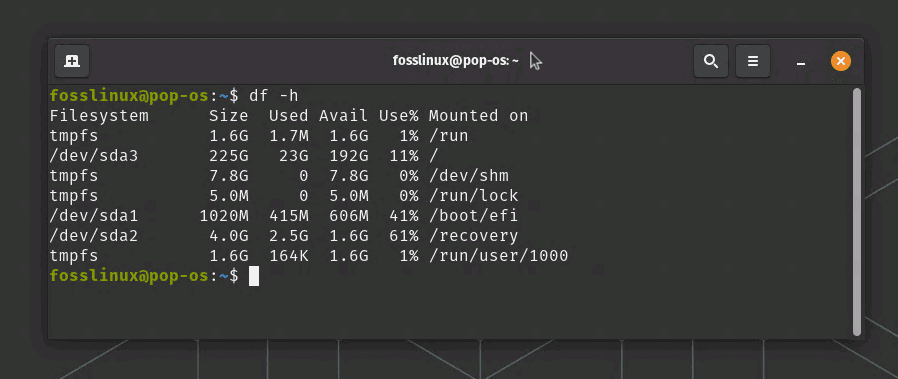
You can use fdisk along with the df command to check the disk space usage on your system:
df -h

df command usage
This will provide a human-readable output of the disk usage for all your partitions.
Formatting partitions
If you’ve created a new partition using fdisk, you’ll likely need to format it before use. You can do this using the mkfs command followed by the filesystem type and the partition:
sudo mkfs.ext4 /dev/sda1
This will format the /dev/sda1 partition with the ext4 filesystem. Be careful with this command, as it will delete any data on the partition.
Conclusion
Understanding how to use fdisk to inspect your hard disk is crucial for effective disk management and maintenance in Linux. With the help of fdisk, you can easily view partition tables, detect issues, and gain insights into your hard disk’s overall structure. By following the steps outlined in this guide, you now possess the knowledge and confidence to use fdisk for routine checks and troubleshooting tasks.
With continuous practice, you’ll master the fdisk command, which will prove invaluable in managing your Linux system and ensuring optimal performance. Keep exploring and honing your Linux skills, as this powerful operating system offers an extensive range of tools and utilities that can make your life easier and more efficient.

