Ubuntu is one of the most popular Linux distributions. That is mainly because of its simplicity, which is an advantage to both Linux newbies and professionals. It is available in various editions but the main ones are:
-
Ubuntu Desktop: This edition is designed for personal computers, laptops, and workstations. It has a user-friendly graphical interface (GUI) and includes a wide range of pre-installed software for everyday use.
-
Ubuntu Server: This edition is optimized for server environments and does not include a graphical user interface by default. It’s designed to be more lightweight and focused on providing a stable platform for server applications and services.
-
Ubuntu Server for Raspberry Pi: Canonical, the company behind Ubuntu, also provides a version of Ubuntu edition specifically optimized for the Raspberry Pi single-board computers. This version allows users to run Ubuntu on these low-cost and energy-efficient devices.
- Ubuntu Studio: This edition is tailored for creative professionals in audio, graphics, and video production. It includes a range of multimedia applications for content creation.
Ubuntu releases
Ubuntu offers two types of releases:
- Long-term support (LTS) releases
- Interim releases.
LTS releases are supported for five years with security updates and bug fixes, while interim releases are supported for nine months. This makes LTS releases a good choice for production environments where stability is important, while interim releases are a good choice for developers and users who want to try out the latest features and software. You can check out our comprehensive post here – Ubuntu LTS Releases: Everything you need to know.
Upgrading Ubuntu to a new release
Now that you’re familiar with Ubuntu releases, let’s explore how to update Ubuntu. Whenever a new Ubuntu release comes out, it is always packed with new updates that include security features, new desktop features and even bug fixes.
In this post, we will assume you want to upgrade to distribution like 22.04 LTS (the latest release as of writing this post). However, the steps and procedures described here can work for any other release.
Considerations to put in mind before upgrading
Here are some important considerations to bear in mind before deciding to upgrade your Ubuntu system:
- While the upgrade process generally retains your data and most application settings, it is advisable to create a backup on an external disk to safeguard your information.
- Once you upgrade to a newer Ubuntu version, reverting to a previous release (e.g., 20.04 or 21.10) is not possible without a reinstall. In such a case, formatting the disk or partition becomes a necessity.
- Prioritize making a comprehensive backup of your data before embarking on a significant upgrade to mitigate any potential data loss.
- Be aware that certain Personal Package Archives (PPAs) and external repositories may not function correctly in newer Ubuntu versions. During the upgrade, all PPAs and external repositories will be temporarily disabled, requiring manual re-enabling afterwards.
- Ensure you have approximately 3-4 GB of free space on your root partition. If necessary, declutter your disk to create sufficient space for the Ubuntu upgrade.
- A stable internet connection is essential for a smooth upgrade process.
- Depending on your internet speed, the entire upgrade procedure may take an hour or less.
- Remember that the upgrade option may not be immediately available after a new version is released. Upgrades are rolled out gradually, and it may take a few days before they become accessible. However, you do have the option to force an upgrade if needed.
How to upgrade Ubuntu to the latest version
Before performing any upgrade, you must know which Ubuntu release you are currently running. You can easily do that by launching the terminal and running the command below.
lsb_release -a
In our case, we are currently running Ubuntu 20.04.6 LTS.

Ubuntu release
As of writing this post, the latest Ubuntu release is 20.04 LTS. Therefore, this post will show you how to upgrade from Ubuntu 20.04 LTS to Ubuntu 22.04 LTS. However, the steps and procedures described here will work for any other Ubuntu release.
There are two methods that you can use to upgrade Ubuntu to the latest version:
- Upgrade Ubuntu graphically (for desktop users).
- Upgrade Ubuntu from the command line.
We will look at all the methods for this post.
Method 1: Upgrade Ubuntu graphically
To get started, launch the “Software & Update” utility from the applications menu. You should see a window similar to the image below.
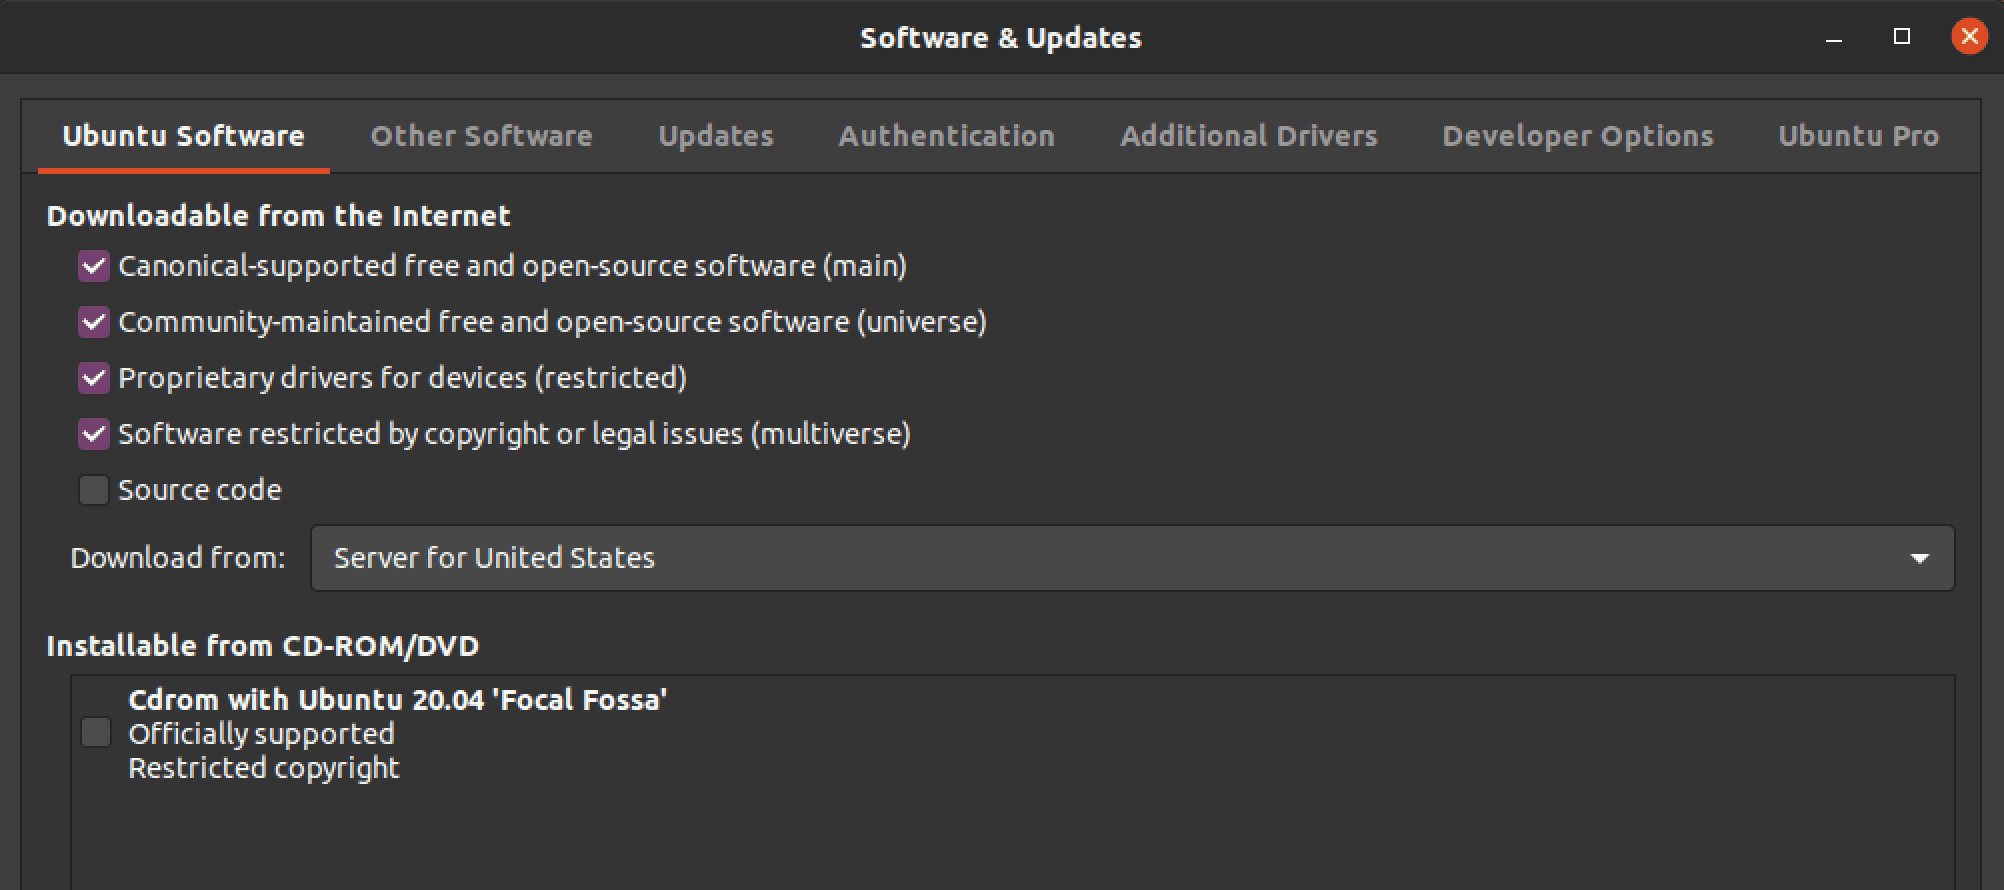
Software and updates utility
Navigate to the “Updates” tab, ensuring that the “Notify me of a new Ubuntu version” setting aligns with any of the following options:
- For any new version: Choose this option if you wish to upgrade to any forthcoming release.
- For long-term support versions: Choose this option if you prefer upgrading exclusively to LTS releases.
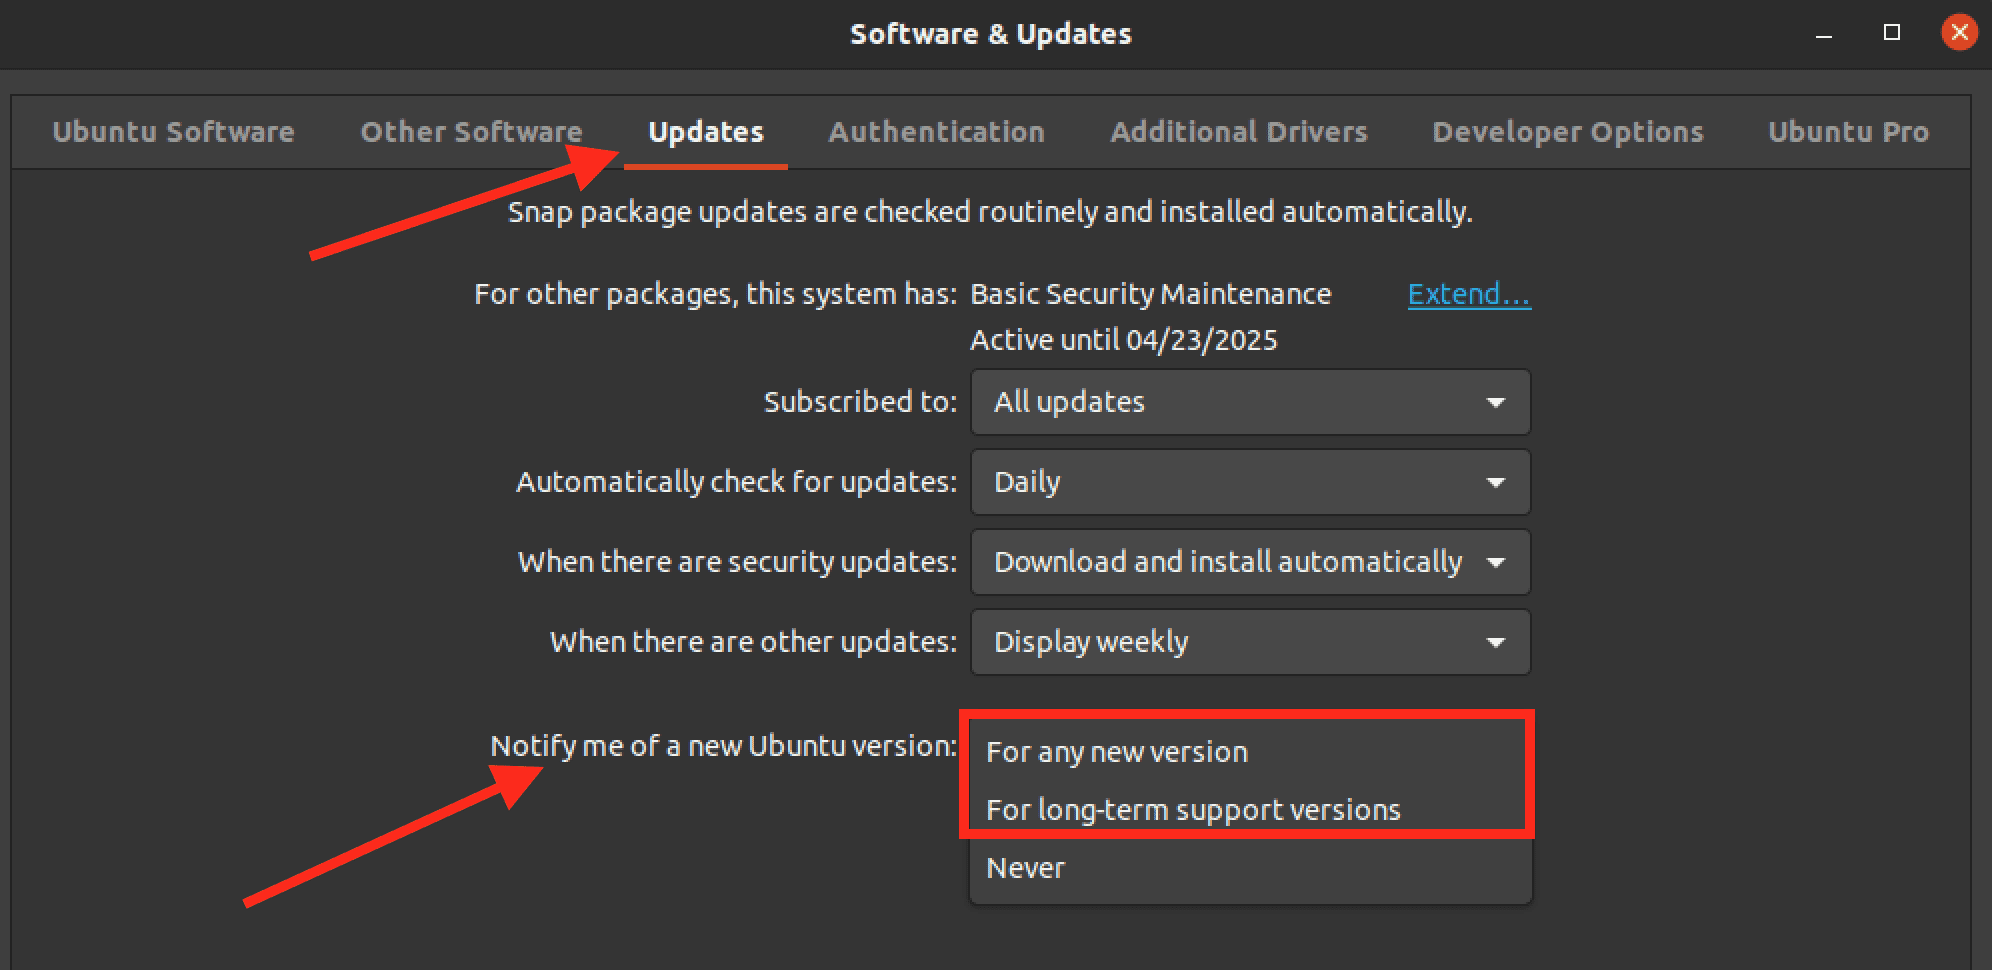
Choose update option
In our case, we will select “For long-term support versions.” LTS releases are much more stable and are maintained for up to 5 years.
This action will trigger the reloading of the Software repository cache. Once the Software Sources settings are correctly configured, access the terminal and execute the following command to update the system. The duration of this process may vary based on your internet speed:
sudo apt update && sudo apt dist-upgrade
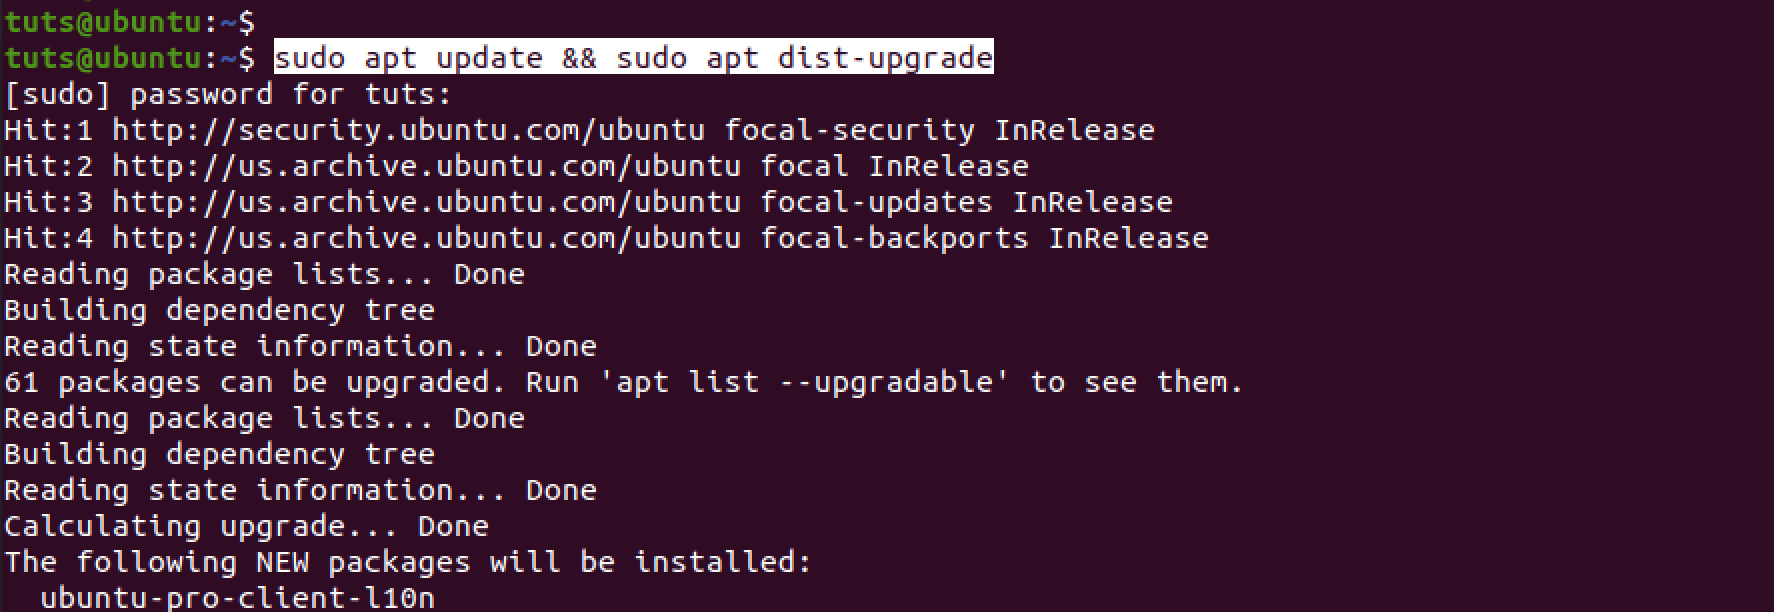
Upgrade Ubuntu
If prompted to restart your system, proceed with the restart.

Restart
Afterwards, launch the Update Manager to check for distribution upgrades:
sudo update-manager
This will open the Software Updater, and you should receive a notification indicating the availability of Ubuntu 22.04 (or any other newer release available.)

Upgrade notification
Click the “Upgrade” button to initiate the upgrade process. Please note that this process might take some time, especially depending on the speed of your internet connection.
Tip: If you don’t see a notification prompting you to upgrade to a newer release, execute the command below with the -d parameter.
sudo update-manager -d
Once you click the upgrade button, you will see a pop-up window with on-screen instructions for upgrading Ubuntu to the new release. Click “Upgrade” to download the release upgrade tool.
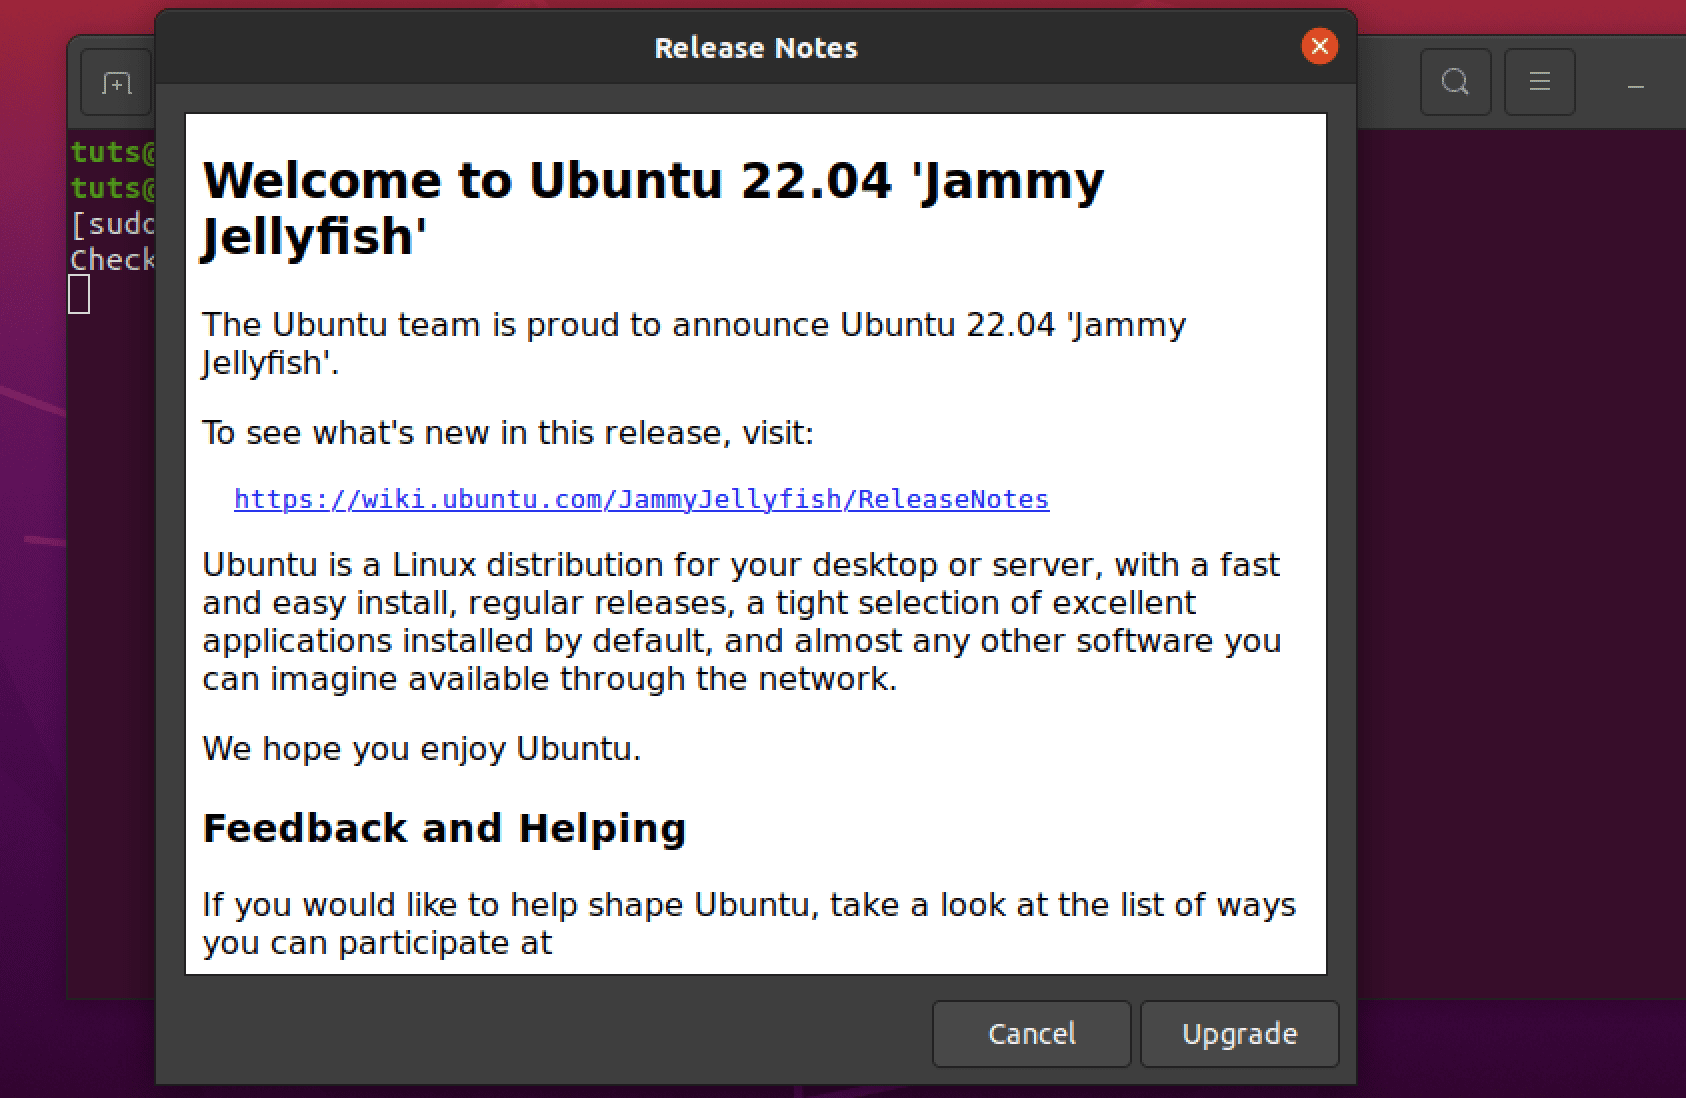
Upgrade Ubuntu
After a successful download, the release upgrade utility will download all the required files and upgrade your current Ubuntu version to the new release.
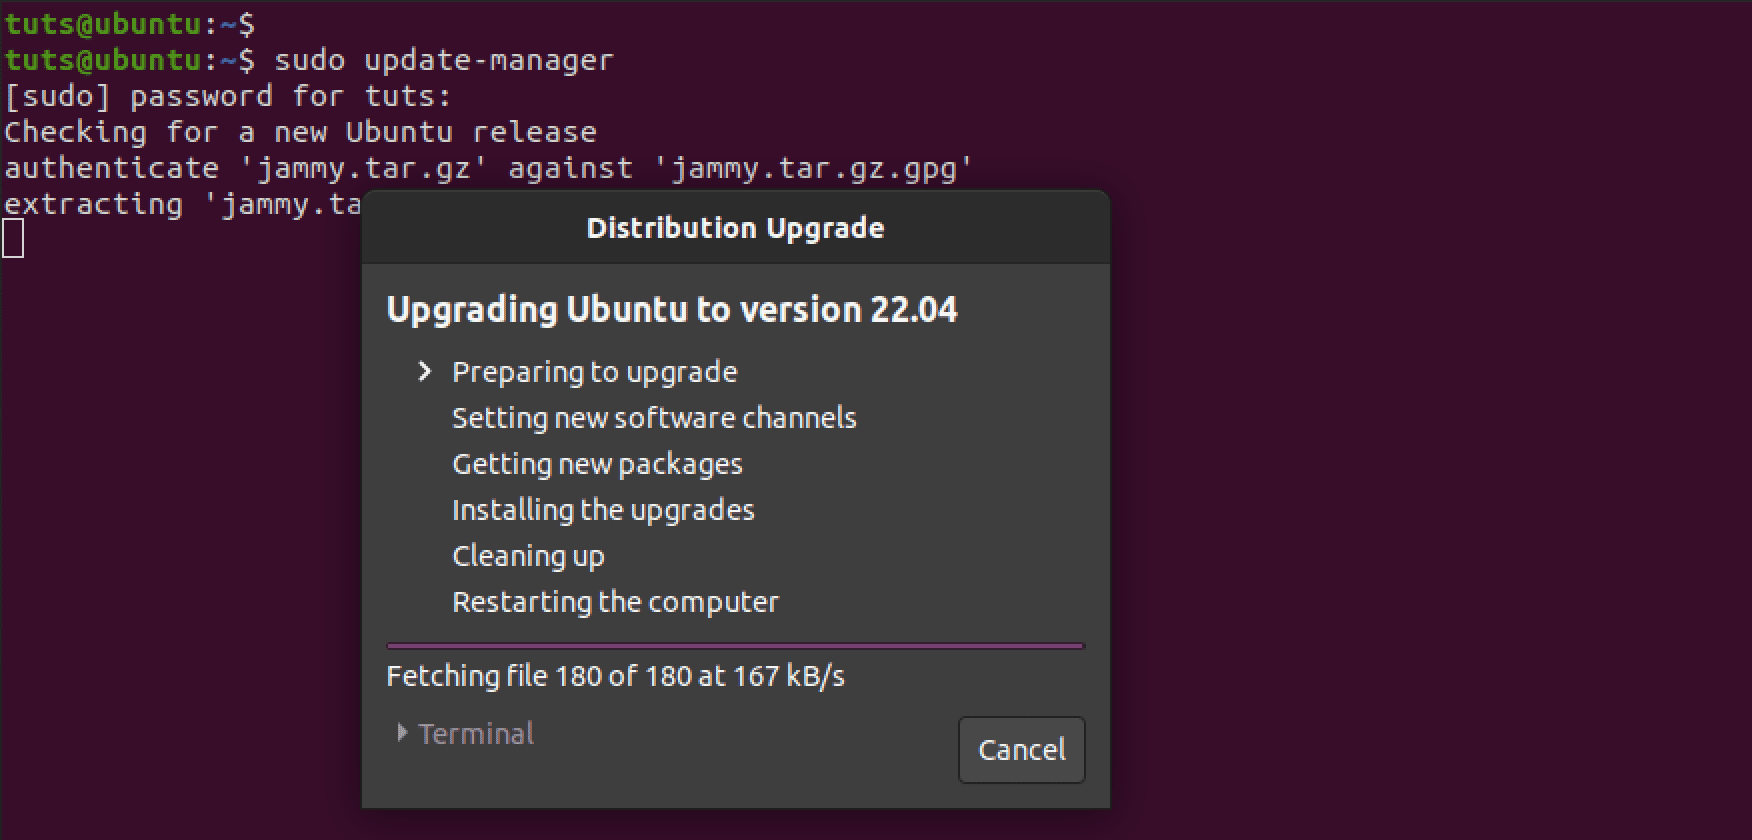
Upgrading Ubuntu
That’s it! You have successfully upgraded your Ubuntu version to the latest release using the graphical utility. Now let’s look at how to upgrade Ubuntu from the command-line.
Method 2: Upgrade Ubuntu from the command line
Follow the steps below to upgrade Ubuntu from the command line.
First, ensure that the essential update-manager-core package is installed on your system. Open a terminal and execute the command:
sudo apt install update-manager-core

install update manager core
Next, it’s crucial to confirm that your update settings are aligned with the LTS (Long-Term Support) version. Check the configuration by verifying that the “Prompt” parameter in the “/etc/update-manager/release-upgrades” file is set to LTS.
Use the command below to edit the file.
sudo nano /etc/update-manager/release-upgrades
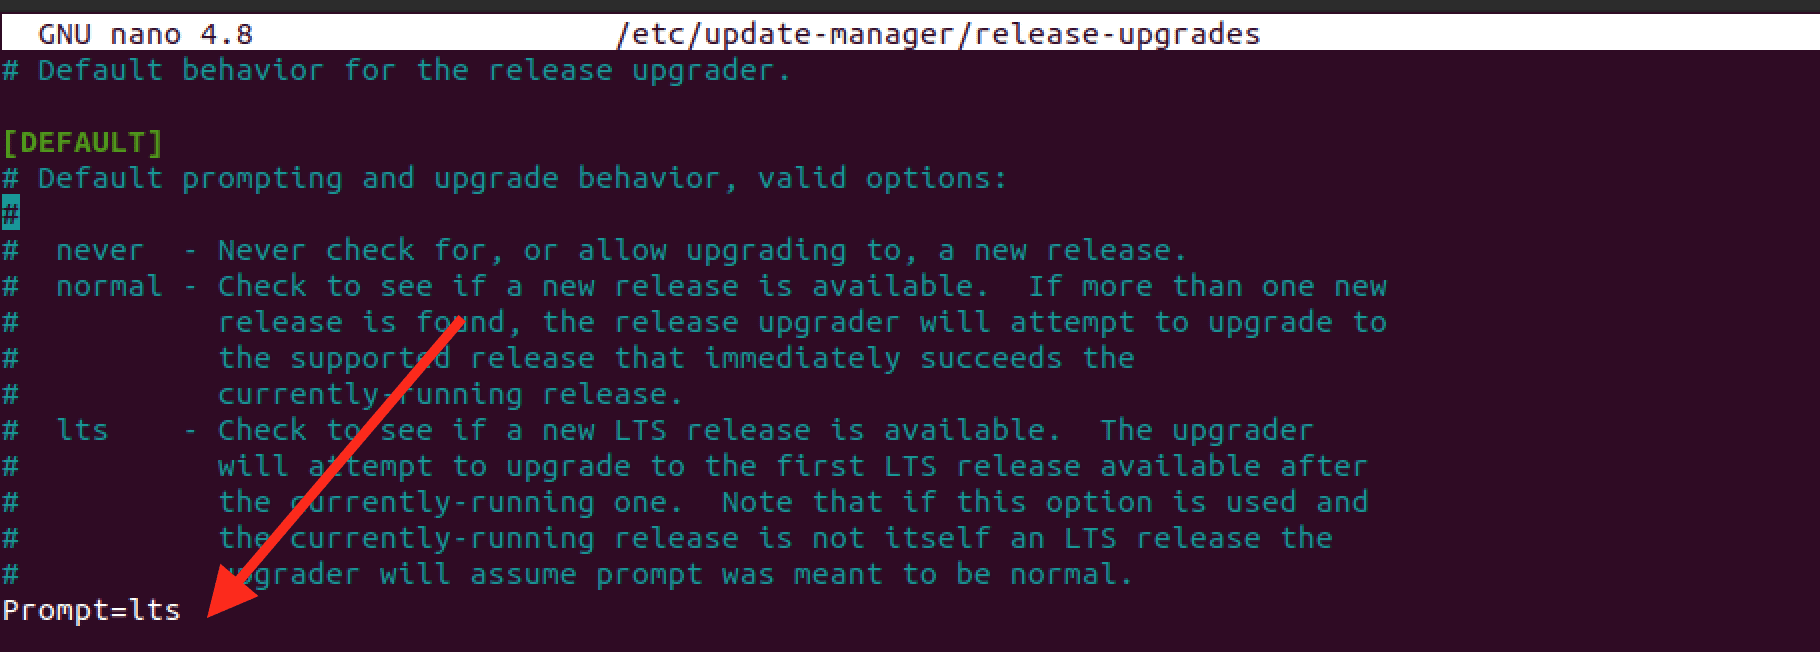
Edit release upgrades file
To ensure a smooth upgrade process, also install any pending software updates with the commands:
sudo apt update && sudo apt dist-upgrade

Run dist upgrade command
Once your system is up to date, restart it by running the command below.
sudo reboot now
Once done, proceed with the Ubuntu upgrade by running the command:
sudo do-release-upgrade
This command initiates a search for a newer Ubuntu version. If a new version is detected, it will download the necessary files, approximately 1.5 GB in size.
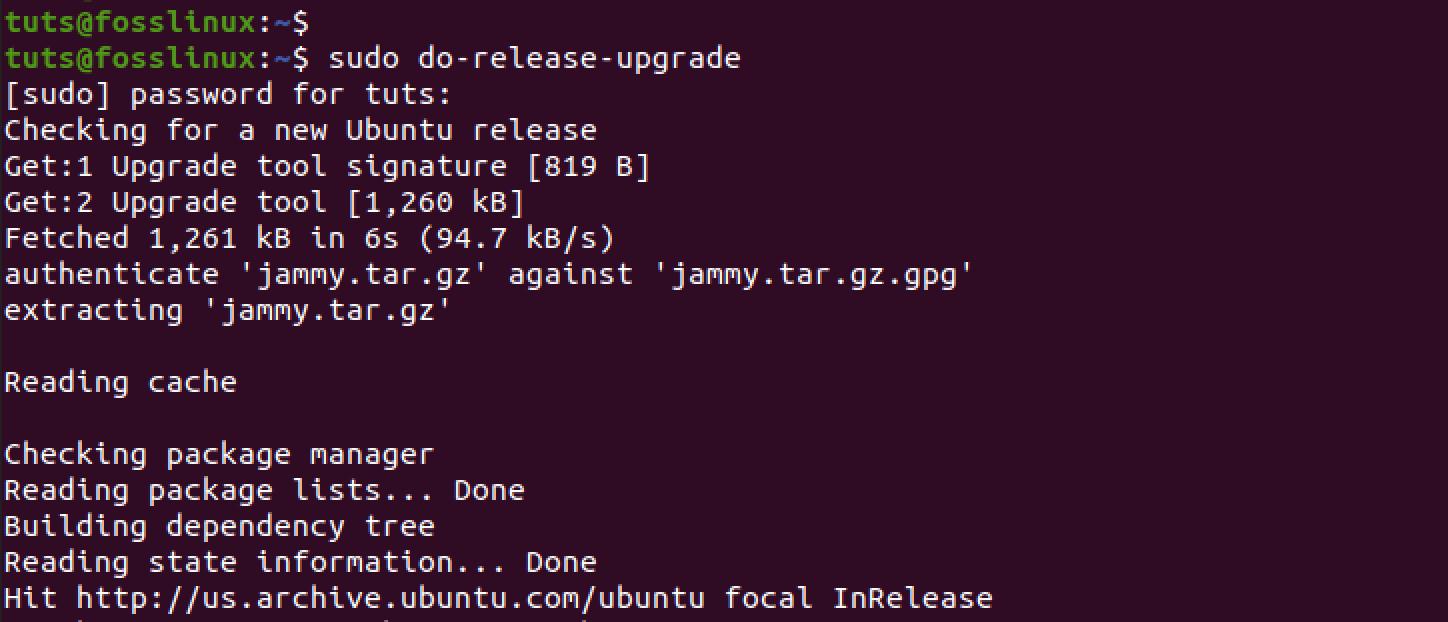
Upgrade Ubuntu
Subsequently, you’ll be prompted to confirm whether you want to install these new packages. Keep in mind that this process may take some time based on the speed of your internet connection.
Verify version upgrade
To confirm whether we are running the most recent version of Ubuntu, namely 22.04, we can execute a single command in the terminal:
lsb_release -a
The lsb_release command provides details about the Linux Standard Base (LSB). Adding the -a option, or –all, instructs the command to present comprehensive information about the distribution, encompassing its distributor ID, description, release number, and codename.

lsb release a command
Within the output, the “Release” label specifically indicates the current Ubuntu version, which, in this instance, is 22.04. This confirmation affirms that the system has been successfully upgraded to the latest iteration of Ubuntu.
Enable disabled third-party repositories
Ensure the smooth operation of your upgraded Ubuntu system by reactivating third-party repositories. Typically, during the upgrade process, these repositories are disabled, potentially leading to issues post-upgrade. To address this, enabling the repositories after the upgrade is a recommended step, although it’s crucial to note that doing so might introduce challenges that need attention.
i) Enable disabled third-party repositories through a graphical interface
To enable disabled third-party repositories through a graphical interface, navigate to “Software & Updates.” Here, you’ll notice that PPAs are listed with annotations such as “disabled during upgrade.” Simply select the checkboxes associated with the PPAs to activate them.
Tip: Some PPAs may not be compatible with the new Ubuntu version. To identify such instances, execute the following command in the terminal:
sudo apt update
This command ensures that your system fetches the latest information about available packages and repositories, revealing any potential issues with the third-party repositories.
ii) Enable disabled third-party repositories from the command line
To re-enable disabled third-party repositories from the command line, follow these steps:
i) Launch the terminal emulator from the application menu
ii) Use a text editor, such as Nano or Vim, to edit the list of software sources:
sudo nano /etc/apt/sources.list
iii) In the sources.list file, locate the lines associated with the third-party repositories that were disabled during the upgrade. These lines often start with “deb” or “deb-src” followed by the repository URL.
Remove the comment symbol (#) at the beginning of each relevant line to enable the repositories. Save and exit the text editor.
After making these changes, update the package information by running:
sudo apt update
This ensures that the system recognizes the re-enabled repositories and fetches the latest package information.
Wrapping up
Upgrading Ubuntu is a pivotal process to embrace the latest features and security enhancements. Whether you opt for the user-friendly graphical method or the command-line approach, it ensures a system that is both current and resilient. Although this post focused on upgrading Ubuntu 20.04 LTS to Ubuntu 22.04 LTS, the procedure and steps described here can still be used to update any other Ubuntu release. Did you come across any issues? Please let us know in the comments below.

