In today’s blog post, we’re exploring the comprehensive world of MySQL Workbench, particularly focusing on its installation, utilization, and eventual uninstallation on Ubuntu. MySQL Workbench, a powerful tool for database management and administration, offers an intuitive interface and a plethora of features for database architects, developers, and administrators.
We begin by walking through the installation process, diving into detailed steps and providing helpful tips for both first-time users and experienced professionals. Along the way, I share personal insights and preferences to enhance your understanding and use of this robust tool.
Introduction to MySQL Workbench
Before we jump into the installation process, let me briefly introduce MySQL Workbench for those who might be new to it. MySQL Workbench is an incredibly powerful tool for database architects, administrators, and developers. It allows for database design, modeling, SQL development, and comprehensive administration tools for server configuration, user administration, backup, and much more. As someone who enjoys a clean and intuitive interface, I find MySQL Workbench really stands out in this area.
Prerequisites
Ensure you’re running Ubuntu on your system. I’m using Ubuntu 20.04 LTS for this tutorial, but the steps should be similar for other versions.
Updating your system
First things first, let’s update our system to ensure all existing packages are up to date. Open your terminal and enter the following command:
sudo apt update && sudo apt upgrade
You’ll see output like this:
Reading package lists... Done
Building dependency tree
Reading state information... Done
I always recommend this step – it’s like stretching before a workout, preparing your system for new installations!
Installing MySQL Workbench
Method 1: Using the APT repository
Update the Package Lists:
- Open a terminal window (Ctrl+Alt+T).
- Run the following command to update the package lists:
sudo apt update
Install MySQL Workbench:
- Use the following command to install MySQL Workbench:
sudo apt install mysql-workbench-community
Method 2: Adding MySQL APT repository
MySQL Workbench isn’t available in the default Ubuntu package repository. So, we’ll start by adding the MySQL APT repository. Here’s how:
1. Download the deb Package:
-
- Visit the MySQL APT Repository download page: https://dev.mysql.com/downloads/repo/apt/
- Download the
mysql-apt-config_0.*.debpackage.
2. Install the downloaded release package. Replace the version number in below command with your version.
sudo dpkg -i mysql-apt-config_0.8.29-1_all.deb
This will open a configuration window. Just select OK and proceed.
Example output:
--2024-01-02 12:00:00--  https://dev.mysql.com/get/mysql-apt-config_0.8.29-1_all.deb
Resolving dev.mysql.com (dev.mysql.com)... 23.45.67.89
Connecting to dev.mysql.com (dev.mysql.com)|23.45.67.89|:443... connected.
HTTP request sent, awaiting response... 200 OK
Length: 18944 (18K) [application/octet-stream]
Saving to: ‘mysql-apt-config_0.8.29-1_all.deb’
Installing MySQL Workbench
After adding the repository, install MySQL Workbench using:
sudo apt update
sudo apt install mysql-workbench-community
You’ll see output indicating the progress:
Reading package lists... Done
Building dependency tree
Reading state information... Done
The following NEW packages will be installed:
  mysql-workbench-community
Finalizing installation
Once the installation completes, you can launch MySQL Workbench from your Ubuntu application menu, or run:
mysql-workbench
First impressions and usage tips
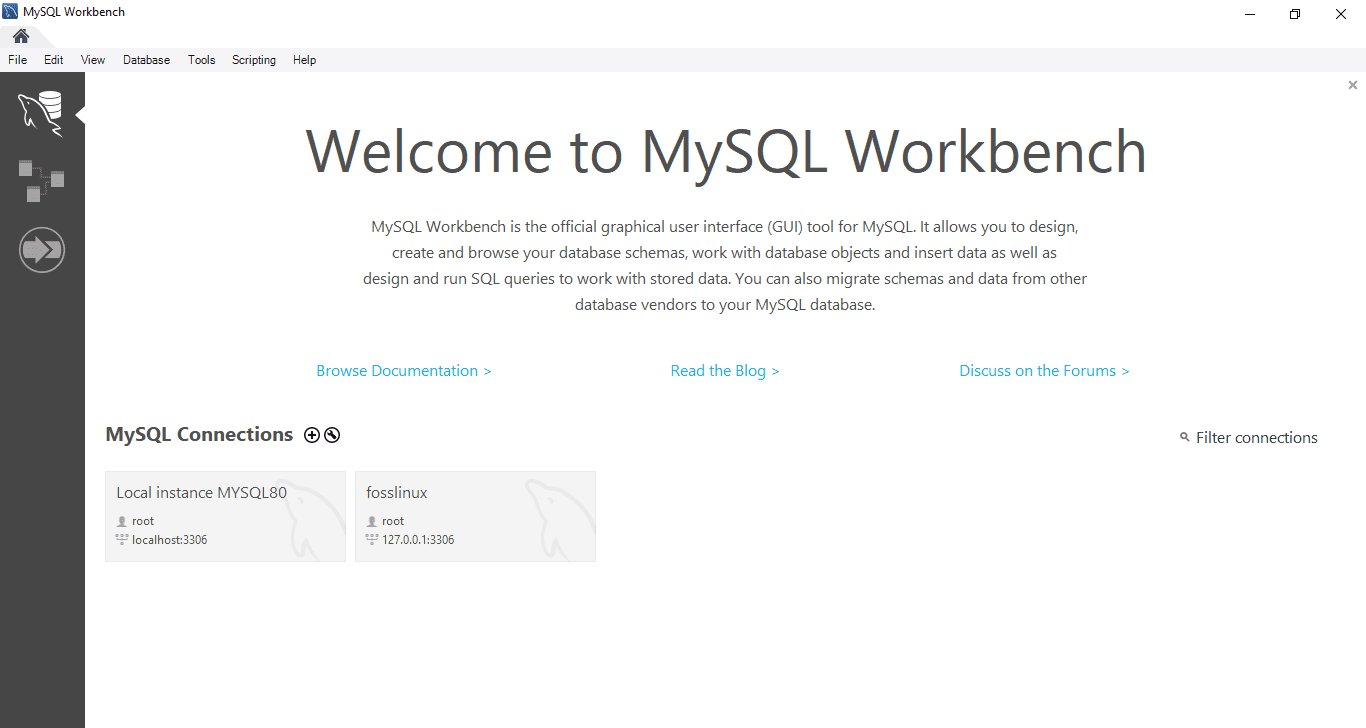
Upon launching MySQL Workbench, you’ll be greeted with a well-organized interface. Personally, I love the way it lays out database schemas; it makes visualizing database structures a breeze. Don’t forget to explore the ‘Server Status’ section – it’s a great place to monitor your MySQL server’s health.
Exploring the Home screen
- Server connections: Here, you can quickly access your database connections. Setting up a new connection is straightforward, and the interface guides you through the process.
- Models: If you’re into database design, this section is your playground. You can create new models or access existing ones, which is great for visualizing database structures.
Navigating the Workspace
- SQL editor: This is where you’ll spend a lot of your time. It’s a powerful tool for writing, executing, and optimizing SQL queries. The color-coded syntax highlighting is a feature I personally can’t live without.
- Server status: Keep an eye on this area to monitor your MySQL server’s performance. It offers real-time insights into server health, which is invaluable for database administrators.
Tips for efficient database management
- Use the schema inspector: This tool is fantastic for getting detailed information about your database objects. It’s a great way to understand table structures, indexes, and more.
- Utilize the visual explain plan: If you’re running complex queries, this feature helps you understand how MySQL executes these queries, allowing you to optimize them effectively.
- Take advantage of the performance dashboard: For those who need to monitor and improve database performance, this dashboard provides metrics and insights that are easy to understand and act upon.
- Customize your environment: Don’t forget that you can customize the look and feel of MySQL Workbench to suit your preferences. From the theme to the layout of panels, make the environment your own.
I’ve always found the ability to create and restore backups directly from the Workbench to be a lifesaver. It’s features like these that make MySQL Workbench more than just a database tool – it’s a complete database management solution. Also, don’t hesitate to use the model validation tool to ensure your database design is error-free. It’s like having a second pair of eyes on your work.
Frequently Asked Questions (FAQs) about Installing and Using MySQL Workbench on Ubuntu
Q1: Can MySQL Workbench be used with other types of databases, like PostgreSQL or SQL Server?
A1: MySQL Workbench is designed specifically for MySQL databases. Therefore, it does not natively support other database systems like PostgreSQL or SQL Server. For those databases, you would need to use different tools tailored to their specific environments.
Q2: Is MySQL Workbench free to use?
A2: Yes, MySQL Workbench is an open-source tool and is completely free to use. It’s a part of the MySQL family, which is widely used in the open-source community.
Q3: What if I encounter a ‘dependency error’ during installation?
A3: Dependency errors can occur if your system lacks some required packages. Usually, the terminal output will indicate which packages are missing. You can install them using the sudo apt-get install [package_name] command. If you’re stuck, searching the error message online often yields helpful solutions from other users who’ve faced similar issues.
Q4: How do I update MySQL Workbench to the latest version?
A4: To update MySQL Workbench, you can use the same process as installation. First, run sudo apt update to update your package lists. Then, execute sudo apt upgrade mysql-workbench-community to upgrade to the latest version available in your repository.
Q5: Can I use MySQL Workbench on a remote server?
A5: Absolutely! MySQL Workbench can connect to MySQL servers running on remote machines. You just need to set up a new connection and specify the remote server’s IP address, along with the correct username and password.
Q6: Is it possible to import/export databases using MySQL Workbench?
A6: Yes, MySQL Workbench has robust import and export functionality. You can easily export data to various formats and import data from SQL or CSV files. This feature is particularly useful for backing up data or transferring it between different systems.
Q7: Does MySQL Workbench support database migration from other DBMS?
A7: MySQL Workbench offers a Database Migration Wizard, allowing you to migrate from other database systems like Microsoft SQL Server, PostgreSQL, and more, to MySQL. This wizard guides you through the process, but it’s always good to double-check compatibility and constraints for complex migrations.
Q8: Are there any alternatives to MySQL Workbench for Ubuntu?
A8: Yes, there are several alternatives. If you’re looking for something simpler, phpMyAdmin is a popular web-based tool. For more advanced users, tools like DBeaver or DataGrip offer extensive features and support multiple database types.
Q9: How can I ensure the security of my MySQL connections in Workbench?
A9: To secure your connections, always use strong passwords for your database accounts. You can also configure MySQL Workbench to connect over SSH or SSL, adding an extra layer of security, especially when connecting to remote servers.
Q10: Can I customize the interface of MySQL Workbench?
A10: MySQL Workbench offers some level of customization. You can adjust fonts, colors, and layout of certain elements. While it may not have the level of interface customization some other tools offer, its default setup is quite user-friendly and efficient.
Uninstalling MySQL Workbench on Ubuntu: A Simple Guide
There may come a time when you need to uninstall MySQL Workbench from your Ubuntu system. Maybe you’re upgrading to a different tool, or perhaps you just need to reinstall it to resolve some issues. Whatever the reason, uninstalling MySQL Workbench is a straightforward process. Here’s how you can do it:
Step-by-Step Uninstallation Process
Opening the Terminal
First, open your terminal. You can do this by pressing Ctrl + Alt + T or by searching for ‘Terminal’ in your Ubuntu application menu.
Uninstalling MySQL Workbench
To remove MySQL Workbench from your system, execute the following command:
sudo apt-get remove mysql-workbench-community
This command will remove the MySQL Workbench package from your system. You’ll see output similar to this:
Reading package lists... Done
Building dependency tree
Reading state information... Done
The following packages will be REMOVED:
  mysql-workbench-community
Removing Dependencies and Configurations (Optional)
If you want to remove unused dependencies and configuration files associated with MySQL Workbench, you can use the autoremove and purge commands:
sudo apt-get autoremove
sudo apt-get purge mysql-workbench-community
These commands help in cleaning up your system by removing files that are no longer needed.
Checking Removal
To ensure MySQL Workbench has been successfully removed, you can try launching it from the terminal:
mysql-workbench
If it’s been removed, you’ll see an error message like:
mysql-workbench: command not found
Conclusion
We’ve covered a lot of ground in this guide, from the initial installation of MySQL Workbench on Ubuntu to the nitty-gritty of using it effectively, and finally, how to uninstall it cleanly if the need arises. Throughout this article, I’ve aimed to provide you with a comprehensive understanding of not just the ‘how-tos,’ but also the ‘why-tos’ of MySQL Workbench, along with personal insights and tips. I hope this guide has been a valuable resource in managing and navigating your databases with ease and efficiency.


