When working with any operating system or app, it is highly recommended to keep updating it regularly with each official release. That helps in fixing security flaws, bugs, and performance issues. For example, Ubuntu will always notify you to update your system whenever a new version is released. However, there are situations where you might need to downgrade.
This post will provide a comprehensive guide on downgrading Ubuntu without messing up configurations or losing data.
Why you might need to downgrade Ubuntu to a previous version
Most users eagerly anticipate updating their system to the latest version. However, there are times when downgrading Ubuntu to a prior version becomes necessary. Here are some reasons why you might need to do so.
- Software compatibility issues: Every Ubuntu release comes with new updates in dependencies required to run various applications that you might decide to install later. These new updates might raise conflict issues, leading to performance and app crashes. The best solution for such a scenario is downgrading to the last working release you used.
- Driver compatibility problems: It is expected to face issues with drivers after upgrading your Ubuntu system to a new release. That mainly affects peripheral devices that you need to connect to your PC. In such a situation, the only fix you might resolve is downgrading your Ubuntu system.
- Stability issues: Although every new release has fixes to improve security, features, and performance, you might sometimes experience stability issues. In such cases, you might resolve to downgrade your system to fix these issues that arise.
- Feature rollback: Certain features are removed whenever a new Ubuntu version is released. If you liked a feature/ app and cannot get it to run on the latest release, you can roll back to the previous Ubuntu version.
What you need to know before downgrading Ubuntu
Before we start getting technical, it is essential to note a few things before you downgrade your Ubuntu system to an earlier version.
Backup your data
Before you start downgrading Ubuntu to an earlier version, protect your files and information by backing them up. Downgrading can be tricky, and there’s a risk of losing or damaging your data during the process. To play it safe, create a system backup, including important files, documents, and settings. You can use external storage, cloud services, or backup tools. A backup ensures that you can quickly restore your system to its previous state if anything goes wrong during the downgrade.
Choose the target Ubuntu version for downgrading
When contemplating downgrading your Ubuntu system, knowing which version you intend to downgrade to is crucial. Identify the specific Ubuntu release that aligns with your requirements or resolves any issues you may face. This ensures a smooth and intentional downgrade process, helping you achieve the desired outcome without unnecessary complications. Before proceeding, double-check that the targeted version meets your needs and is compatible with your system’s hardware and software requirements.
Verify compatibility for software and hardware
Before initiating the Ubuntu downgrade process, it’s essential to assess your software’s and hardware’s compatibility with the target version. Examine whether the applications and software you rely on are supported in the version you’re downgrading. Additionally, ensure that your hardware components, such as graphics cards and peripherals, are compatible with the selected Ubuntu release. Identifying and addressing potential compatibility issues beforehand minimizes the risk of functionality gaps or system errors after the downgrade.
Downgrading Ubuntu to a previous version
There are two main methods that you can use to downgrade your Ubuntu system:
- Tweaking the sources.list file
- Installing an earlier Ubuntu version
We will look at both methods in this tutorial.
Method 1: Tweak the sources.list file
The sources.list file is a critical configuration file in Ubuntu that determines the software repositories from which your system fetches updates and packages. It is located in the /etc/apt/ directory. When downgrading Ubuntu using this method, you’ll be modifying the sources.list file to point to the repositories corresponding to the desired earlier version. This file contains entries for the official Ubuntu repositories, and by adjusting these entries, you essentially instruct the package manager to fetch packages and updates from the specified release.
Note: It’s crucial to exercise caution while editing this file, ensuring that you accurately reflect the target version and avoid any typos or errors. This method offers a direct approach to version control, enabling users to revert to a specific Ubuntu release by manipulating the sources.list file.
Step 1. Edit the sources.list file
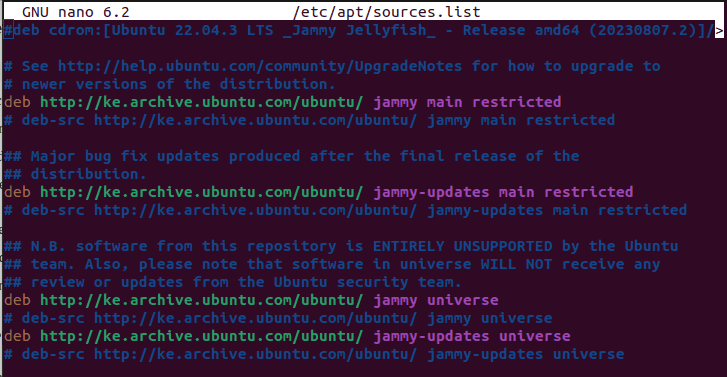
In this particular post, we will be downgrading from Ubuntu 22.04LTS, which goes by the codename “Jammy Jellyfish,” to Ubuntu 20.04 LTS, which goes by the codename “Focal Fossa.” Currently, our sources.list files look similar to the image below.

Source-list file
You can see the word “jammy” in every repository, which means we are currently downloading our updates from the Ubuntu 22.04 LTS repository. Now, we need to replace every instance of “jammy” with “focal.” You can decide to do that manually or use the command below.\
sudo sed -i 's/jammy/focal/g' /etc/apt/sources.list
Our new sources.list file looks similar to the image below.

New sources-list file
Step 2: Create a preferences.d file for a smooth rollback
In the next important step of downgrading Ubuntu, we need to ensure that the packages on your system match the version of the target release. Since your current setup might have newer package versions than the one you’re downgrading to, it’s crucial to guide the apt package manager accordingly.
We will create a new file in the /etc/apt/preferences.d directory to do this. We will call it “focal.” However, you can rename it to the Ubuntu version you wish to install.
Use the command below to create the /etc/apt/preferences.d/focal file.
sudo nano /etc/apt/preferences.d/focal
Add the provided content to the preferences file, but remember to replace the codename with your chosen target version (for example, “focal”).
Package: *
Pin: release n=focal
Pin-Priority: 1001

Package: *
Pin: release n=focal-updates
Pin-Priority: 1002

Package: *
Pin: release n=focal-security
Pin-Priority: 1003

Create a preferences-d file
Save the file (Ctrl + S) and exit (Ctrl + X).
Step 3: Downgrade Ubuntu
Up to now, you have everything ready and set to downgrade your Ubuntu system. Launch the terminal and execute the commands below one by one.
sudo apt update

sudo apt upgrade

sudo apt dist-upgrade
Note: This process comes with some risks, and there’s a chance it could crash your crash, possibly leading to the loss of essential data. Before you begin the downgrade, make sure you’ve backed up all your crucial information.
Method 2: Downgrade Ubuntu by installing an earlier release
If you don’t want to go through the hassle of editing the configuration file and fixing any errors that arise, you can opt for a much simpler method – installing an earlier Ubuntu version of your choice. This is the best method if you have enough space for your internal storage.
The first step is downloading the Ubuntu version that you wish to install. Since you are downloading an earlier version, you must access the Ubuntu archives page. Earlier versions aren’t listed on their official downloads page. Here, you will see a list of Ubuntu releases, including the first-ever official release of Ubuntu 14.04 LTS. In our case, we will download the Ubuntu 20.04 LTS.
Your next step involves crafting a bootable USB drive using the recently downloaded ISO file and installing the operating system on your PC. For guidance through this process, refer to our post, “How to Create a Live Linux USB Drive Using Etcher.” This resource will walk you through the necessary steps, ensuring a smooth and successful installation experience. Once done, you can install Ubuntu on your PC using the USB drive.
Conclusion
This post has shown you two ways of downgrading to an earlier Ubuntu version. You can tweak the configuration files of your currently installed version and downgrade it to an earlier version or install an earlier version of Ubuntu. However, there are also other methods that you can use.
One is running an earlier Ubuntu version as a virtual machine. You will need to use virtualization software like VMware or VirtualBox. Check out this post for more details. How to set up virtual machines on Ubuntu. Another option is running the operating system directly from a USB drive, a live session. This choice is beneficial when you only want to experiment with a feature or conduct tests.
We trust this article has provided valuable assistance in downgrading your Ubuntu system. If you have any challenges or insights you’d like to share with our readers, please share your thoughts in the comments section below.

