As a developer, you understand the importance of having the right tools for the job. One of the most popular and powerful version control systems available is Git. However, managing Git repositories can be a challenge, especially when working with multiple repositories or collaborating with other developers.
That’s where GitKraken comes in. GitKraken is a popular Git GUI client that makes it easy to manage your repositories and collaborate with others. In this guide, we’ll show you how to install GitKraken on Fedora, one of the most popular Linux distributions for developers.
Why GitKraken?
Before we jump into the installation process, let’s talk about why GitKraken stands out. This graphical Git client is a game-changer for developers. Its intuitive interface, powerful features, and cross-platform support make it a must-try. Here are a few features that particularly won me over:
- Intuitive Interface: GitKraken presents a visually appealing and user-friendly interface, making Git commands more approachable.
- GitFlow Support: This feature streamlines the workflow with a clear visual representation, aiding in feature development and release management.
- Merge Conflict Resolution: GitKraken simplifies the often daunting task of resolving merge conflicts, a feature I personally find invaluable.
- Integration with Popular Services: Whether you’re using GitHub, GitLab, or Bitbucket, GitKraken integrates seamlessly, making repository management a breeze.
While I’m all praises for its features, I do have a slight gripe with its performance on older hardware. It can be a bit resource-heavy, but if your machine is relatively modern, you’re unlikely to face any issues.
Installing GitKraken on Fedora
Now, let’s get to the part why you’re here – installing GitKraken on Fedora. The process is straightforward, but following each step carefully will ensure a smooth installation.
Step 1: Downloading the RPM Package
GitKraken offers an RPM package, which is perfect for Fedora users. Head over to the official GitKraken website and download the latest RPM file for Fedora. Or, you can use the wget command in the terminal to download it directly:
wget https://release.gitkraken.com/linux/gitkraken-amd64.rpm
Step 2: Installing the Package
Once the download is complete, you can install the RPM package using the DNF package manager, which is as simple as running the following command in your terminal:
sudo dnf install ./gitkraken-amd64.rpm
Step 3: Launching GitKraken
After the installation completes, you can start GitKraken from your application menu, or by typing gitkraken in your terminal. The first launch might take a bit longer as it sets up, but subsequent launches should be quicker.
Setting Up Your Workspace
Congratulations on installing GitKraken on your Fedora system! The first time you launch GitKraken, you’ll be greeted with a few setup steps to tailor your experience. Let’s walk through what you can expect and how to make the most out of your initial setup.
Step 1: Sign In or Create an Account
Upon launching GitKraken, you’ll be prompted to sign in. If you already have an account, simply log in with your credentials. If not, you’ll have the option to create one. While you can use GitKraken without an account for public repositories, signing up unlocks the full suite of features, including private repo access and more.
Step 2: Configure Git Settings
After signing in, GitKraken will ask you to configure your Git settings. This includes setting up your name and email address, which will be used as your commit signature in Git. This step is crucial for team collaborations, as it identifies you as the author of your commits.
Step 3: SSH Key Setup
GitKraken will offer to set up SSH keys for you, facilitating secure connections to remote repositories without the need for typing your username and password every time. If you’re new to SSH keys, I recommend letting GitKraken handle this for you. It’s a straightforward process, and it saves a lot of time in the long run.
Step 4: Clone or Initialize a New Repository
Now comes the exciting part—getting your projects into GitKraken. You have two primary options:
- Clone an existing repository: If you have a project hosted on GitHub, GitLab, Bitbucket, or another Git service, you can clone it directly into GitKraken. Just provide the repo’s URL, and GitKraken will do the rest.
- Initialize a new repository: Starting a new project? GitKraken can initialize a new Git repository on your machine, getting you ready to start coding in no time.
Step 5: Explore the Interface
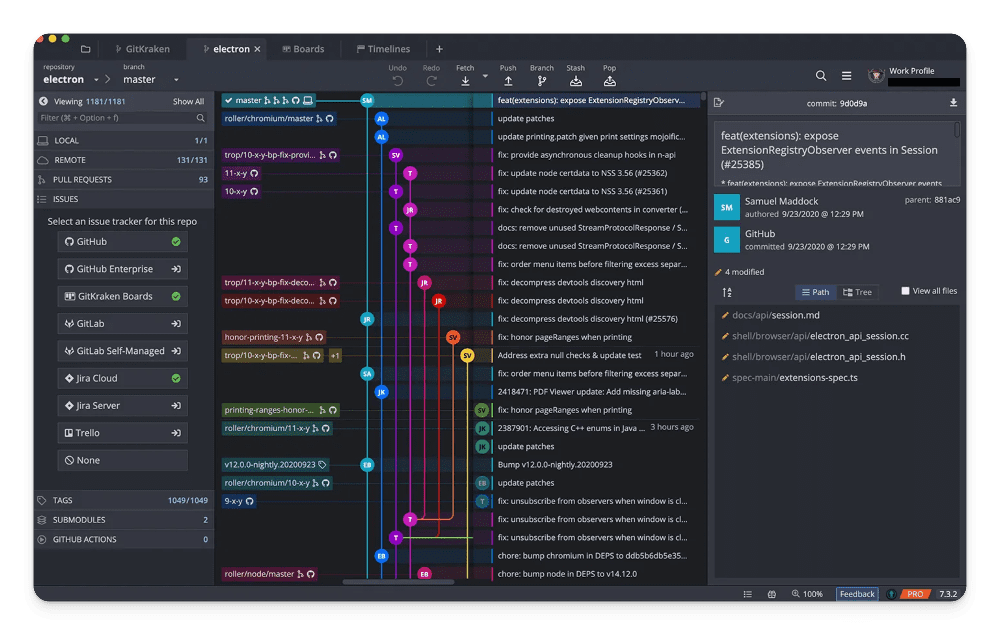
Take some time to familiarize yourself with GitKraken’s interface. The left sidebar gives you quick access to your repositories, the central area displays your commit history and branch structure, and the right sidebar contains detailed commit information, stashes, and more. The intuitive design makes navigating your Git repositories a breeze.

Gitkraken User Interface
Uninstalling GitKraken
If, for any reason, GitKraken doesn’t meet your expectations, uninstalling it is just as easy as the installation process. Simply run:
sudo dnf remove gitkraken
This command will remove GitKraken from your system.
Conclusion
In this guide, we’ve covered the steps to install GitKraken on Fedora. With these instructions, you should now be able to easily install and use GitKraken on your Fedora system. By following the steps outlined in this guide, you’ll be able to take advantage of GitKraken’s powerful features and improve your development workflow.

