Now and then, we need to format our USB flash drives and SD cards for various reasons. Some of these include changing the file system (NTFS, FAT, FAT32, etc.), deleting all current data, or remove a virus or malware present in the drive.
In this post, we are going to look at how you can format your USB drive or the SD card on the Ubuntu operating system. Most of these methods will also work with other Debian based operating systems like Kali Linux, elementary OS, Zorin OS, Parrot, Tails, Debian, and many more.
Ubuntu OS enables users to format their drives in several ways. For this article, we will look at both graphical ways and command-line tools.
Format a USB drive using Graphical tools
Some of the graphical disk management tools that we will use include Gparted, the Disks utility, and File manager.
1. Using the Disks utility
Disks utility is the default disk management tool for all Ubuntu systems. It is pre-installed and thus comes at the top of the list. With a clean and straightforward user interface, this tool is easy to use even for beginners getting started with Linux distributions.
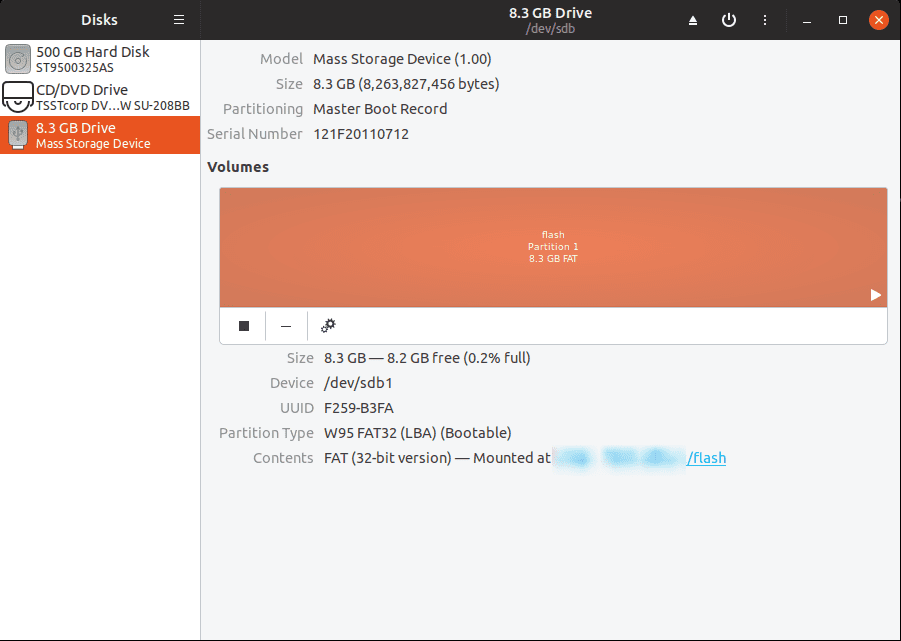
Disks Utility
This tool comes bundled with amazing features like Drive formatting, Edit partition, Edit file system, Repair file system, create and restore partition image, and many more. Let’s focus on the formatting feature.
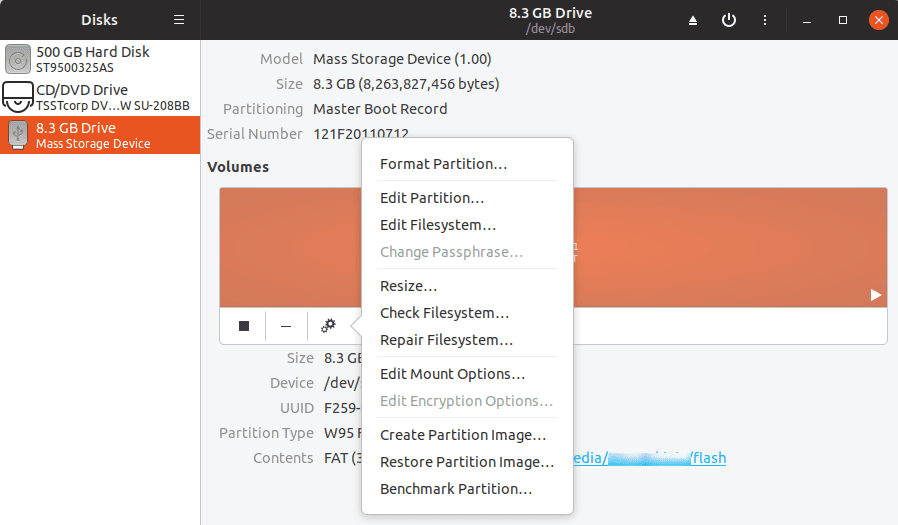
Disks Utility Features
Step 1) Plug the USB drive into your PC. Ensure it is working and listed on the file manager.

USB drive listed in the file manager
Step 2) Launch Disks utility from the applications menu.
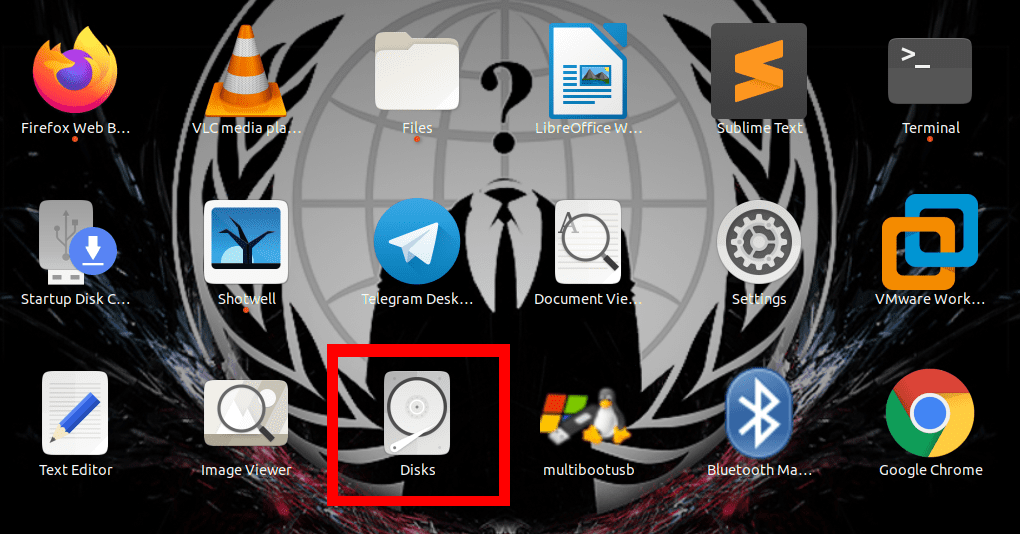
Launch Disks from the application menu
Step 3) Select the USB drive you want to format. For this post, we will work with an 8 GB USB drive.
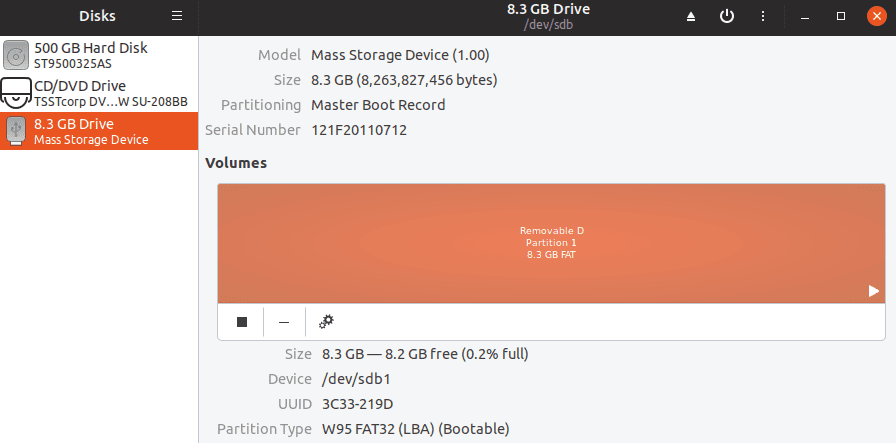
Select the USB drive to Format
Step 4) Click on the Settings button and select the Format option.
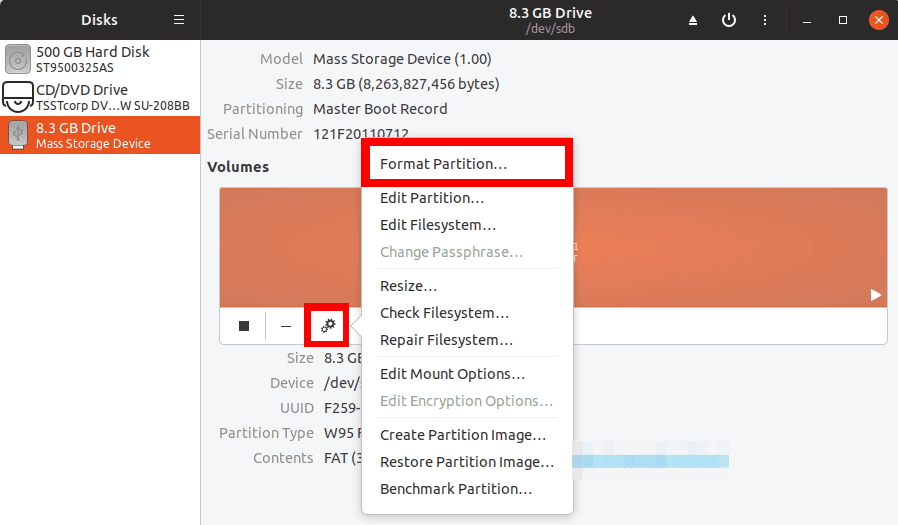
Format
This action will open a window with several options to choose before formatting your USB drive. You will need to enter the Volume name, which will become the new label for your USB. Select whether to Erase all data in the USB drive. This process is efficient if you don’t want anybody running data recovery tools on the USB; however, it will take longer. Lastly, you will need to select the file system to use ion the drive (NTFS, EXT4, FAT, or Other).
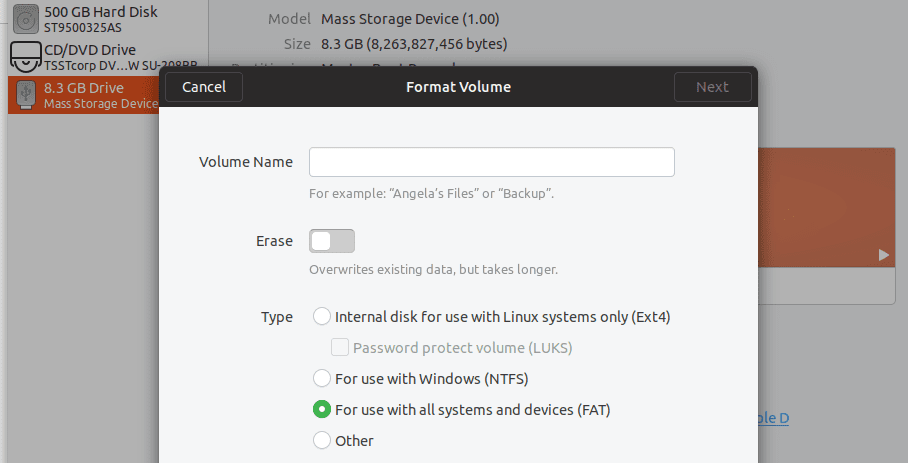
Set options on the USB drive
Step 5). Once done, click on the Next button present on the top-right corner of the window. A window will open listing your selected drive and giving you a warning that all data will be lost. If you are contented with the information contained, click Format.

Format the USB drive
The process of formatting the USB drive will begin. Time-taken will matter on the options set, the processing speed of your PC, and the general write speed of your USB drive. Once done, you should be able to see it listed on the files manager.
2. Using File Manager
Formatting a USB drive using the file manager is the easiest method. This method makes use of the Disks utility that we discussed above, but you don’t have to go the long process of launching the Disk utility. Instead, we use the right-click context menu.
Step 1) Plug your USB drive into the PC.
Step 2) Open the file manager window and check that it is listed as shown below.

USB drive listed in the file manager
Step 3). Right-click on the USB-drive and choose the format option.

Format
Set the Volume name and select the file system of choice. Once done, click on the format option.

Set options on the USB drive.
When the process is completed successfully, you should be able to see your USB drive listed on the file manager with the new volume name.
3. Using GParted
Gparted is an open-source disk management tool for the Linux system. Unfortunately, it doesn’t come pre-installed in Ubuntu. Use the command below to install GParted for your Ubuntu OS via Terminal.
sudo apt-get install gparted
Once the app is installed, launch it from the applications menu.

launch Gparted Applications menu
Since it requires root privileges to run, a window will pop-up prompting you to enter the root password. The GParted window will open, and it will start loading your disks. Note, while using GParted, you will not be able to access unmounted drives and partitions.
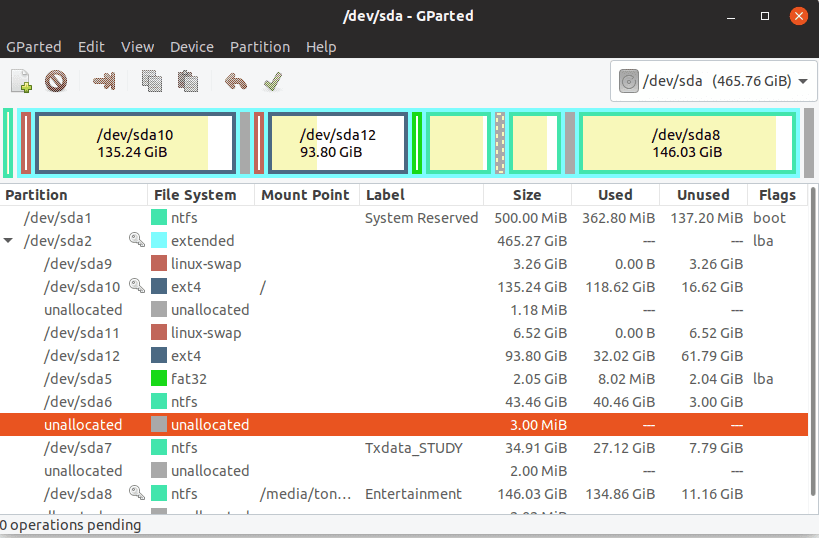
Gparted Window
Gparted comes with quite an intuitive user interface with a lot more functionalities compared to the Disks utility. Additionally, if you are working with a dead hard drive, you can download the ISO file, create a bootable USB drive and use it to boot your PC or laptop and work on the hard-drive.
Let’s look at the step by step procedure of formatting a USB drive with GParted.
Step 1). Select the drive you are working on, from the top-right corner. You can see the image below.

Select the USB drive to Format
Step 2). If the USB drive were already mounted, the format option would be grayed. Therefore, we need to unmount it. Right-click on the USB drive and select the Unmount option.
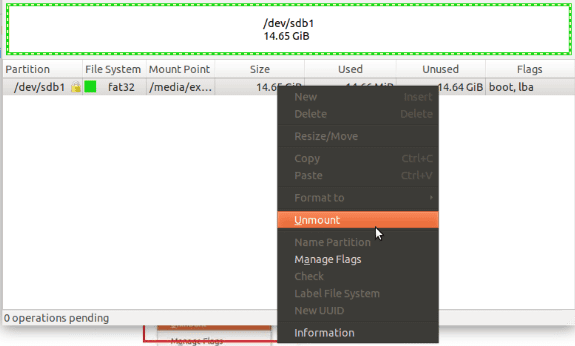
Unmount USB drive
Step 3). Once the drive is unmounted, we can now start the formatting process—right-Click on the USB-drive and select, “Format to” option. You will also need to choose the file system you want to use on the drive.
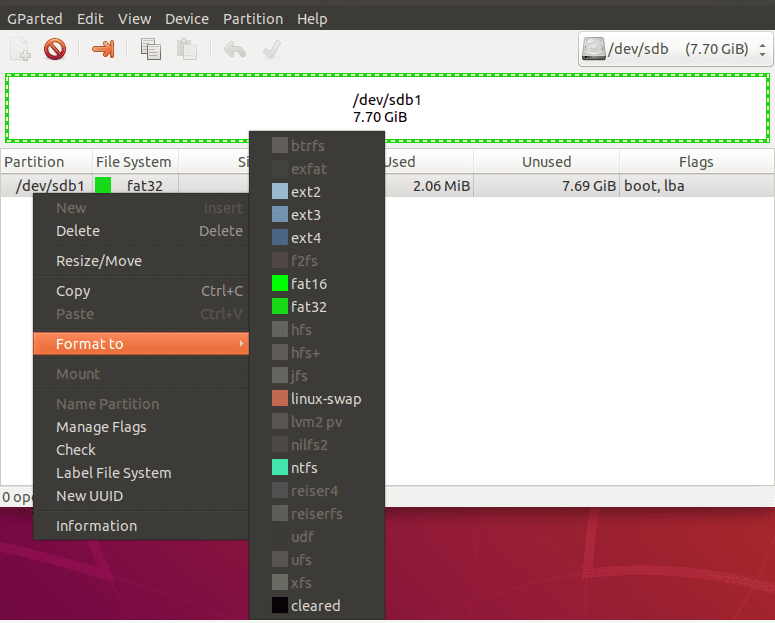
This action will be added as a pending operation. You can add as many operations as you like.

Pending Operations
Step 4). To complete the formatting process, you need to click the “Apply all operations” button. It’s a green tick icon at the top of the Gparted window.

Apply all Operations
Step 5). A window will pop-up, warning you that the operation will lead to complete loss of data on the USB drive. Click the Apply button to continue or Cancel to stop the process.
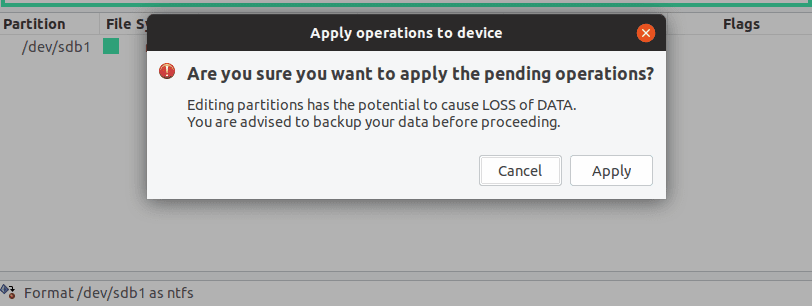
Click Apply to Continue Formatting.
The formatting process will start. A progress window will load, displaying the general progress.
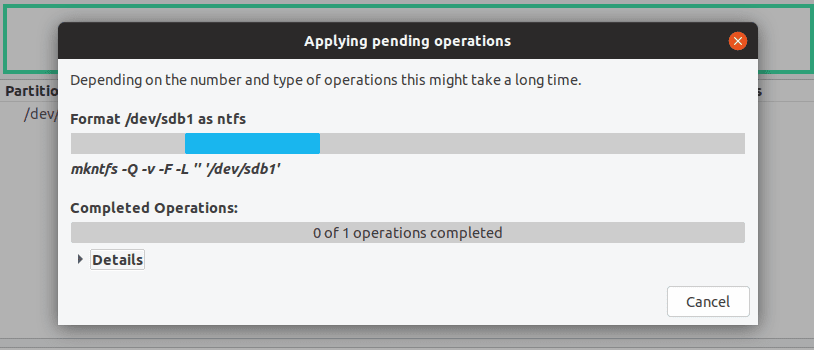
Formatting Progress Gparted
Step 6). Once the operation is complete, a window will open to notify you. Click the close button.
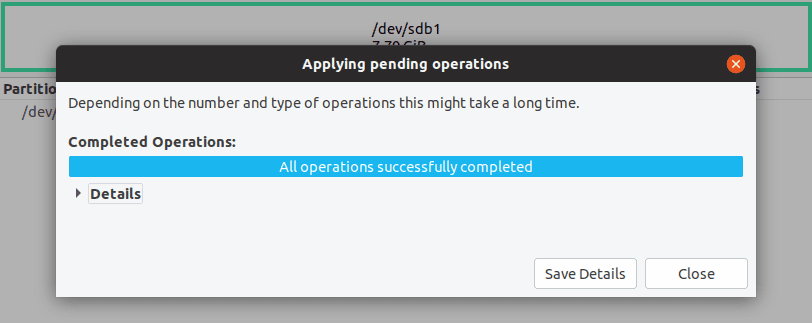
Format process complete
Your USB drive is formatted! Close the Gparted window, and you should now see your USB-drive listed on the file manager.
Format a USB drive using the Command-line (Terminal)
Other than the use of Graphical tools, Ubuntu enables users to format drives using one of its most potent utilities – Terminal. The method is recommended for users with a good experience working with Linux commands.
Step 1) Insert your USB drive and Launch the Terminal.
Step 2) Identify the drive you want to format by running any of these commands.
sudo df -h

df command
sudo fdisk -l

The Fdisk command
Note, you should be very careful here; otherwise, you will end up formatting the wrong drive. For this post, we will work with dev/sdb1.
Step 3). If the USB drive is mounted, we will need to unmount it. Execute the following commands.
sudo umount <drive label>
e.g.,
sudo umount dev/sdb1
Step 4). Now give a command to format the drive. It will differ depending on the file system you want to use. Execute any of the commands below, keeping a focus on the different file systems.
sudo mkfs.vfat /dev/sdb1
sudo mkfs.ntfs /dev/sdb1
sudo mkfs.ext4 /dev/sdb1
When the process is complete, your drive should be formatted to your desired file system. You should be able to access it from the file manager.
Conclusion
That’s all about the best methods of formatting the USB drive and SD cards on your Ubuntu PC by GUI, as well as the command-line methods. Most of these methods should also work with other Debian based operating systems.
Is there any other method you use which we have not listed here? Feel free to let our readers know in the comment section. If you find this article useful, don’t forget to share the link with friends.

