Vuze (previously Azureus) is one of the popular BitTorrent clients out there. It is extremely customizable, provides VPN support, has robust settings and options for ultimate torrent control, and also has remote control ability via the web or mobile app.
I have recently installed it on my Ubuntu 18.10 LTS PC and found some concerns with the settings which I will be discussing in this article.
Before heading to the issue I faced, let me quickly put together steps on how to install the program on your Ubuntu PC.
Installing Vuze BitTorrent Client
Vuze is no longer available in Ubuntu repository, but the good news is it’s is available as a Snap Store app.
Step 1) Click “Activities” and launch “Ubuntu Software”.
Step 2) Search for “Vuze” in the Ubuntu Software search box.
Step 3) Click “Install”.

Installing Vuze
Step 4) Enter root password when you see the prompt.
That’s it!
The Error… “Can’t write to the Application Folder”.
After installing Vuze, you can launch it from Activities search box or from the Applications menu. First time launch will take some time. In a slow system, it could as much as 30 seconds! So be patient.
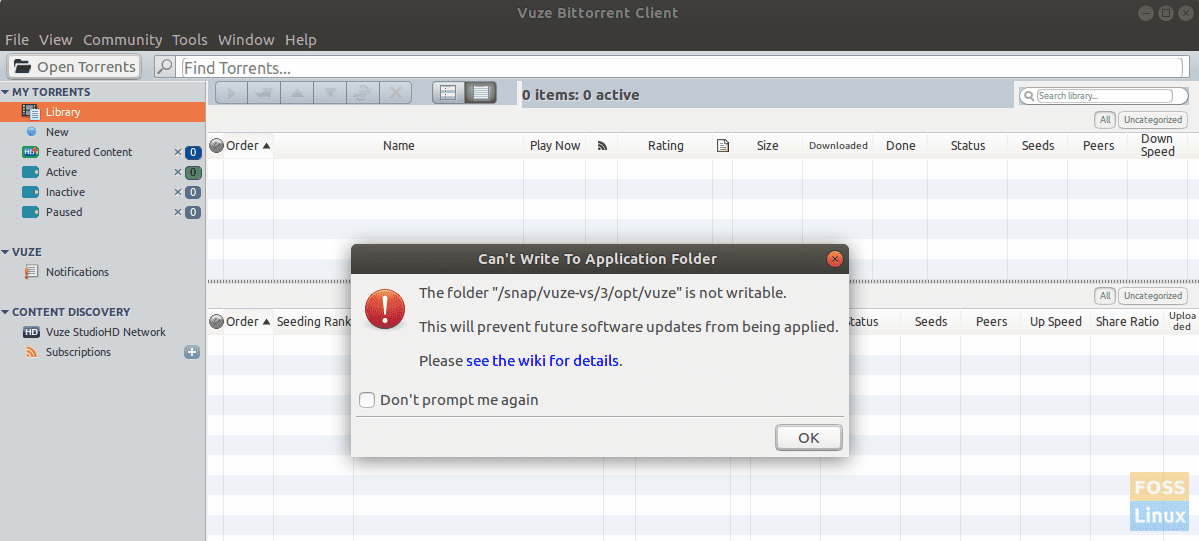
After the program opens, you may probably see a pop-up saying “Can’t write to Application Folder. The folder “/snap/vuze-vs/3/opt/vuze” is not writable. This will prevent future software updates from being applied”.

This error message definitely looks scary as it’s apparent that future updates will not progress successfully. Evidently, we must fix it to stay updated.
Thankfully, the error message is clear and looks like it’s only an access issue. All we have to do is give necessary write permissions to the concerned directory and everything should be good to go. Here are the complete steps:
Step 1) Launch ‘Terminal”. You can use Ctrl+Alt+T shortcut in Ubuntu.
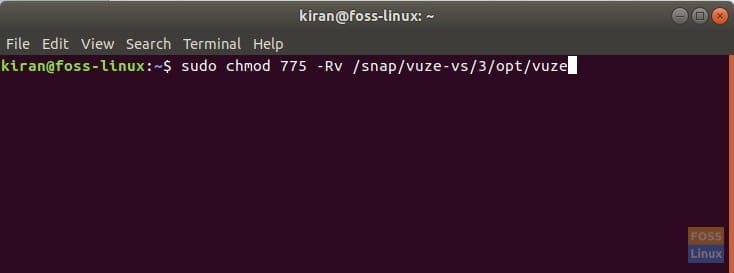
Step 2) Enter the following command and press enter.
Beginner’s tip: chmod command in Linux is used to set permissions to the files and folders. -R is used to indicate recursive action, i.e. include objects in subdirectories. -v is verbose for displaying the objects.
sudo chmod 775 -Rv /snap/vuze-vs/3/opt/vuze

Fixing Vuze Folder Access Issue
Step 3) Pay attention to the Terminal and enter the root password when you see the prompt.
Step 4) You should see the lengthy process in the Terminal including some failed objects. It is completely normal. The main directories which are needed should be processed successfully in the end.
Next time when you launch Vuze, you should not see the warning pop-up anymore.


7 comments
Didn’t worked for me, Using Solus v4
It’s wird because Vuze is in the same path and chmod works the same on every linux distribution.
Nop, doesn’t work
: failed to change mode of ‘/snap/vuze-vs/3/opt/vuze’ from 0755 (rwxr-xr-x) to 0775 (rwxrwxr-x)
🙂
Worked great on ubuntu 19.10 desktop, thanks
Didnt work :
failed to change mode of ‘/snap/vuze-vs/3/opt/vuze’ from 0755 (rwxr-xr-x) to 0775 (rwxrwxr-x)
Does not work on ubuntu 20.04 desktop.
root@max:/# chmod -R 775 /snap/vuze-vs/3/opt/vuze
chmod: changing permissions of ‘/snap/vuze-vs/3/opt/vuze’: Read-only file system
Yep same here… did not work 🙁
failed to change mode of ‘/snap/vuze-vs/3/opt/vuze’ from 0755 (rwxr-xr-x) to 0775 (rwxrwxr-x)
ubuntu 22.04 … did not work
chmod: changing permissions of ‘/snap/vuze-vs/3/opt/vuze’: Read-only file system
failed to change mode of ‘/snap/vuze-vs/3/opt/vuze’ from 0755 (rwxr-xr-x) to 0775 (rwxrwxr-x)