Generally, a hostname is just an assigned name to a computer, laptop, or any other connected device to a network. You can say a hostname is a computer’s nickname, and it is used to identify the machine over the network uniquely.
Sometimes you need to name your computer with a new hostname so it would be easy to recognize it. It is highly recommended not to name two computers on the same network with the same hostname because this would result in a conflict in the network causing issues. The hostname is used to uniquely identify your computer over a network.
In this tutorial, we are going to walk you through changing your Ubuntu machine’s hostname. There are several ways to do it, and we are going to discuss all of them.
Changing your Ubuntu System’s Hostname
We shall look at the command line as well as GUI methods.
Check Computer’s Current Hostname
Before we can start, you can check the current hostname using the following command in the terminal.
hostname

Display Current Hostname
As you can notice, my computer’s current hostname is FOSSLinux. In the next few steps, we are going to change this to a new one.
Change Hostname via Command Line
In this section, you will learn how to change your machine hostname using the command line method using the terminal. There are multiple commands you can use, such as:
- hostname command
- hostnamectl command
Change Computer’s Hostname Using hostname Command
Using this method, you will be able to change your computer hostname permanently without even needing to reboot the system.
Step 1. Launch the terminal using this shortcut keys Ctrl + ALT+ T.
Step 2. Use the following hostname command with your the new hostname you need:
sudo hostname FossLinux1

Change Hostname
Step 3. Open the hostname configuration file using your favorite editor.
sudo vi /etc/hostname
Configuration File
Step 4. Edit the hostname configuration file and add the new hostname:
FossLinux1
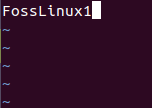
New Hostname
Step 5. Open the “hosts” configuration file using your favorite editor.
sudo vi /etc/hosts
Open Hosts Configuration File
Now you need to ensure that you have commented on all the old hostnames using the “#” symbol. Then add the new hostname as follows:
127.0.0.1 FossLinux1
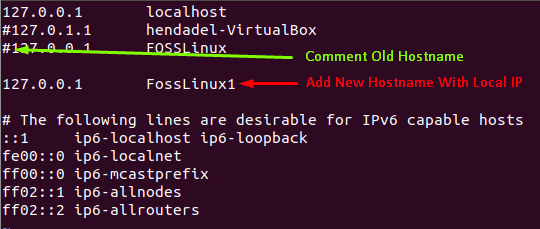
Edit Hosts Configuration File
Step 6. Go and check your hostname now.

Hostname Changed To FossLinux1
Change Computer’s Hostname Using hostnamectl Command
Step 1. Check the current computer hostname using the command:
hostnamectl
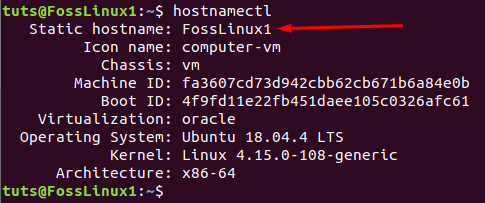
Display Current Hostname Using hostnamectl
As you can observe, the current computer’s name is FossLinux1, and we are going to change this.
Step 2. Use the hostnamectl to set your computer’s name.
sudo hostnamectl set-hostname FossLinux2

Change Hostname to FossLinux2
Step3. Edit the /etc/hosts file using your favorite editor.
sudo vi /etc/hosts
Edit Hosts Configuration File and Add FossLinux2
Ensure you have commented out the old hostname and add your new hostname as follows:
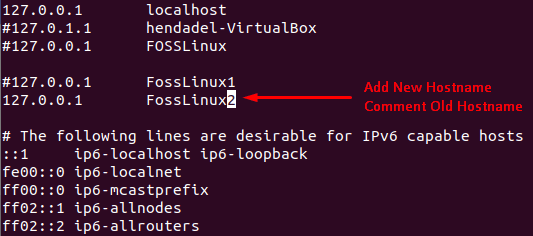
After Editing Hosts Configuration File and Add FossLinux2
Step 4. Check your current hostname.
hostname

Check Current Hostname
Change Hostname Via Graphical User Interface
The easiest method for changing your computer hostname is through the system graphical settings menu.
Step 1. Open the drop-down arrow from the top of the screen.

Open the Arrow
Step 2. Select the settings button.
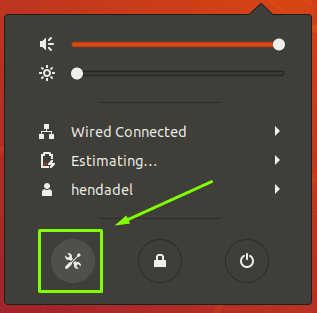
Open System Settings
Step 3. From the left menu, select the Details menu.
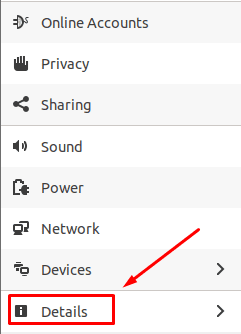
Open Details Menu
Step 4. Next, open the About option.

Select The About
Step 5. From the right side, you will find your computer’s information. The hostname can be found under the device name.
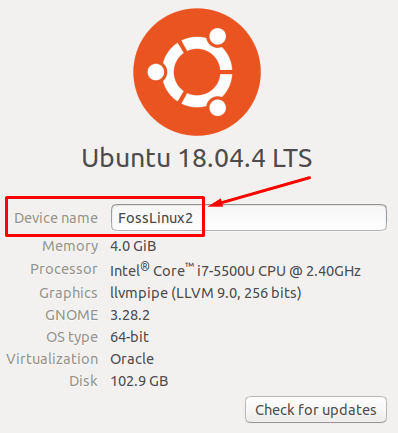
Device Hostname
Step 6. Easily you can change the device hostname to a new one.
Change Hostname
Step 7. Reboot your system.
Step 8. Check your current hostname.

Check Hostname
Congratulations; you have just learned how to change your computer’s hostname using various methods. That’s it!

