Linux systems can be optimized into having longer battery usage, courtesy of Slimbook battery saver. Slimbook battery saver is an open-source tool that was created by the Slimbook hardware manufacturer. They make and sell laptops running on Linux based operating systems). It is effective in GNOME, KDE, Cinnamon, Unity, and MATE desktop environment.
The app can be integrated with other applications, services, and drivers like AMD, NVIDIA, TLP, and Intel_pstate. This makes it compatible with Slimbook computers and those that run with Ubuntu and its derivatives. Slimbook’s official PPA contains the most advanced Ubuntu derivatives packages, including Ubuntu 16.04, Ubuntu 18.04, Ubuntu 18.10, and Ubuntu 19.04, among others.
Installing Slimbook Battery Saver
- The Slimbook battery saver is not available in Ubuntu Software sources
You will first add PPA (An external software respiratory) to your system’s software source list. - Open the terminal from the application menu or using the CTRL + ALT + T keyboard shortcut. Run the following command to add PPA into your system.
sudo add-apt-repository ppa:slimbook/slimbook

Add Slim PPA
Type your password and enter to finish up the process.
- Update the software sources of your system for Ubuntu to detect the new PPA, cache it, and add your local software source database by running the following command in the terminal:
sudo apt update

Update System
- Check on all the pending updates in your system by launching the terminal and running the command below:
sudo apt list --upgradable

Upgrade system
The list of all the pending updates in Ubuntu will be displayed.
5. Install all the pending software updates and patches in your system by running the following command:
sudo apt upgrade

Perform Upgrades
It is essential to perform this step because the latest Ubuntu patches, kernel updates, and drivers will improve your battery life.
6. By now, your system is up to date, a perfect state for installing the Slimbook Battery software. To install it, run the command below in your terminal:
sudo apt install slimbookbattery

Install Slimbook
No configuration is required after the installation. Close the terminal using the exit command, then launch the Slimbook Battery Saver from the application menu. At that moment, the Slimbook Battery is set to off. You will have to switch to one of the three modes by clicking on them to get started.
Slimbook Battery Saver Features
The Slimbook battery saver has two parts: The Applet and the Advanced Mode.
Applet
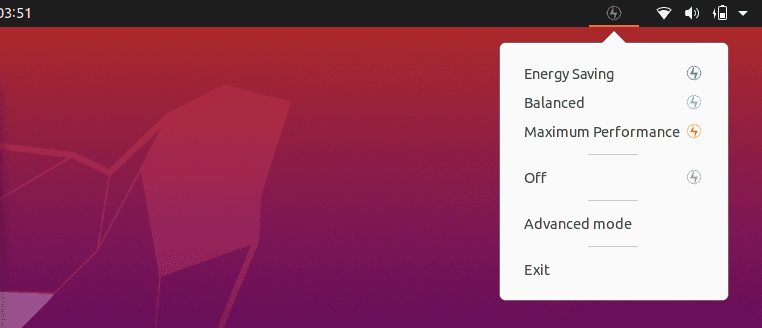
The Applet, which is displayed on the system tray, gives you quick access to basic settings. You can switch between the energy modes, which are: Energy saving, Balanced, and Maximum performance.

Slimbook Applet
This part has three buttons:
- Off button: allows you to deactivate the current energy mode, making the system have normal power consumption at the normal resources rate.
- Advanced Mode button: opens up the application preferences window for configuration of the three predefined modes.
- Exit button: allows you to deactivate the current energy mode and fully close the application. Authentication for this process will be prompted in case a certain energy mode is active at that moment.
Energy modes
-
Energy saving
In this mode, your battery will last longer than normal, as the app will try to save the battery life.
2. Balanced
It is opted for if the Energy Savings mode is too aggressive for your system. The mode gives a perfect neutral environment between Maximum performance and Energy saving.
3. Maximum Performance
The Balanced and Energy Savings does not allow maximum use of your system as some processes are limited. To get the full potential of features performance or when using high-performance apps, switching into this mode will be required.
Each energy mode has default values, but the user’s essential values can be changed when in Advanced Mode to adjust or avoid errors in their hardware.
Advanced Mode
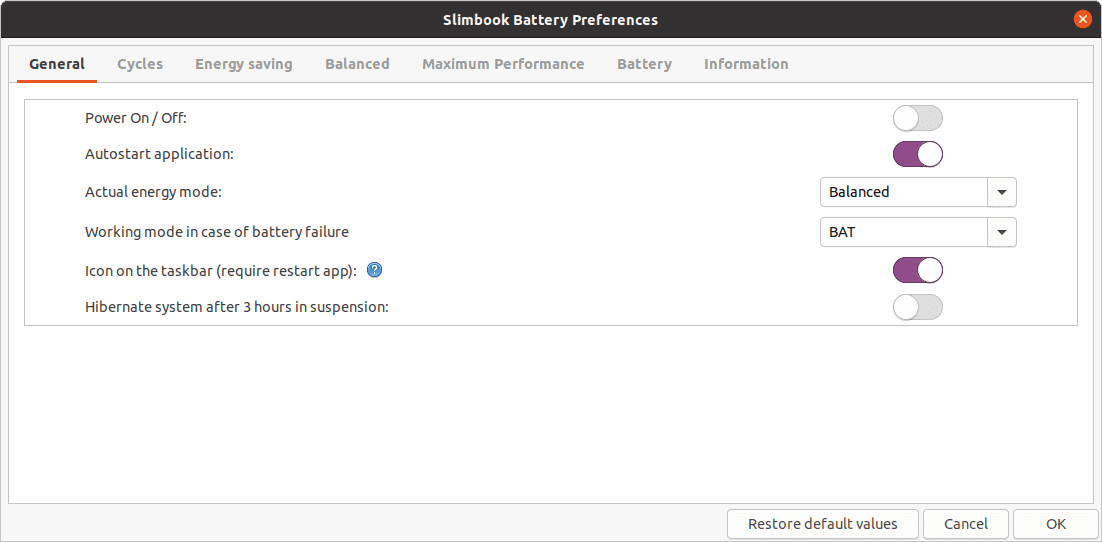
The second part is the Advanced Mode, which opens up the control panel in the advanced settings. This panel has seven tabs, each with different switches and preferences. With the advanced mode settings, you can adjust or fine-tune the three energy modes, for example, by overriding a certain feature.

Slimbook Battery Preferences
Buttons used for navigating through the processes in your system are provided as follows:
- The Power on/off button activates or deactivates the current energy mode.
- The Autostart application button activates or deactivates Slimbook Battery autostart and TLP autostart.
- The Actual energy mode allows selecting an energy mode of your choice.
- The Working mode in case of battery failure button allows you to define the configuration to work with if the power supply used is not detected.
- The Icon on the taskbar allows you to show or hide the bar indicator icon and will be effective only after rebooting your system.
- The Hibernate system, after 3 hours in the suspension button, enables automatic hibernation to save energy if the system is suspended for 3 hours.
- The Battery tab shows the battery information, including the name, manufacturer, model, technology, capacity, remaining percentage, status, power supply, voltage, and energy rate.
Uninstalling Slimbook Battery Software from Ubuntu
You may want to remove the tool from your system due to various reasons. To uninstall:
Launch your terminal and run the command below:
sudo apt remove --auto-remove slimbookbattery

Remove Slimbook
The process is not complete without removing the PPA. To remove the PPA. Run the following command in your terminal:
sudo add-apt-repository --remove ppa:slimbook/slimbook

Remove Slimbook PPA
Bottom line
Having gone through this tool, we find it essential for any Ubuntu system. Launching it into the system guarantees complete optimization of the battery. If the app is not launched, there are no power optimization options that are provided. To avoid this act of launching Slimbook every time of need, you should consider adding it to the Startup Applications.


1 comment
Help!!! I installed Slimbook Battery, and it gave me a notification about changing graphic settings (I figured that is normal), but now when I boot, all I get is a black screen. I can go to a terminal, but that’s it. I tried uninstalling slimbookbattery and tlp/tlp-rdw, but still all I get is a black screen. Any ideas? I need to use this computer in the morning, and I can’t right now! ACK! This is what I get for trying to simply extend my battery life…