Before we look at what MySQL is, let us first discuss what a database is and its use. In a modern setting, databases are common, and they are a standard way of storing data/information. For instance, when you upload a photo to your social media account, your photo gallery acts as a database.
Another instance of database use is when you go to websites, for example, online e-commerce shops, to buy an electronic device. The database, in this case, is the shopping cart where the items you are buying are temporarily stored. Therefore, it is evident that a database is a storage mechanism that we all have encountered in our day-to-day lives.
Note: In summary, a database is a structured collection of data.
If you are familiar with databases, you might have come across the term “relational database.” A relational database is a data that relates to one another. For instance, in a school, a teacher is related to a student in various ways. From the subjects being taught, we can confidently say a teacher is related to a student and vice versa. Hence a relational database is also used to showcase data that relates to each other in one way or another.
A database has various features that we will look at. One of the most common features is a table. A table merely refers to a drawing consisting of rows and columns, just like a spreadsheet. A table in a database contains several relationships that the user should be conversant with. Some of the most notable relationships are:
- A one-to-one relationship
- A one-to-many relationship
- A many-to-many relationship
While dealing with huge tracts of data, the user should have an enhanced way to define databases, tables, and data. This will help in the efficient processing of data. We will require SQL to convert data (Raw information) into information (Useful data).
SQL is the standardized language used in the database. SQL is an abbreviation for Standard Query Language.
The language consists of three parts:
- Data definition language that comprises statements to help you define the database and its objects, such as views, tables, procedures, and many more.
- Data control language that allows you to access specific data in the database.
- Data manipulation, which contains statements to allow you to update and query data.
Since you have a glimpse of databases, it’s time to dive in and look at “What is MySQL.”
MySQL is an open-source database management system categorized as a relational DBMS (Database Management System). Michael Widenius’s daughter “My” was the co-founder of MySQL, thus the name MySQL. The name combines two terms; the co-founder “My” and “SQL,” an abbreviation for Structured Query Language.
MySQL is a database service that is used to deploy cloud-native applications. It is also used for various purposes, including data warehousing, e-commerce, and logging applications. Commonly, MySQL is used in creating, editing, and querying data in a database.
Additionally, MySQL is a database management system that grants the user the opportunity to manage a relational database. Being open-source software, MySQL’s initial source code can be modified and edited for free.
Note: MySQL is offered both as an open-source server edition and as an enterprise server edition. To get the enterprise server edition, you have to buy a commercial license from Oracle.
MySQL is well customized, making it easy to use compared to other databases such as the Oracle Database and the Microsoft SQL Server.
MySQL is compatible with several major Operating Systems such as UNIX, Linux, and Windows. Therefore, we have two procedural options to install this application. The first is to use the server download method, while the other is to use the desktop installation method.
After successfully installing the MySQL program, now let us learn how to create a database. In our case, we will use the server download procedure. You can refer to this article “How to install MySQL on Windows” to get a clear understanding of how to install MySQL onto your Windows operating system.
Have you been inquiring about how to create a database in MySQL? Don’t worry and trouble yourself anymore since this article will go through all the steps required to create a database in MySQL. All you need to do is spare your time and read through this article.
Creating a database in MySQL
In simple terms, creating a database in MySQL is simply the first step towards storing data in a well-structured way. There are useful syntaxes that are used to create databases, as we shall see in this article.
CREATE DATABASE statement is the most important and valuable syntax in this section as it creates a new database in SQL.
In a database creation, the “CREATE” keyword is used in developing or creating. For instance, there are two main create statements in SQL:
- CREATE DATABASE
- CREATE TABLE
Syntax:
CREATE DATABASE database_name;
Note: database_name is the name of the database.
There are two ways one can use to create a database:
- Using MySQL Command Line Client
- Using MySQL Workbench
Creating database using MySQL command-line client
First, you have to specify CREATE DATABASE statement followed by the database name to create a database. A point to note: the database name must be unique within the MySQL server instance. If you don’t provide a unique name to your database, an error alert will pop up from MySQL. When such situations occur, then you need to provide a different name to your database. For instance, a common error is when you use an already existing name to create a database, you will get a pop-up error.
Example:
To create a new database in MySQL (Command Line Client) using the name foss_linux use the following syntax:
CREATE DATABASE foss_linux;

MySQL create a database using command line
If you accidentally used the same name, you can easily create another database; hence you should not freak out if you get the error since it is normal. Alternatively, you can drop the database and create a new one.
While creating the database, you don’t need to worry about character set and collation since MySQL, by default, applies character sets and collates while setting up the database.
To create a new database with the aid of the MySQL command-line client, as shown above, you should stick to the following guidelines:
- First, log in using the provided root user credentials you created while installing MySQL on your operating system.
- Use the CREATE DATABASE statement to create a new database
- Use the SHOW DATABASES statement to return a list of existing databases to the current server.
To check the newly created database, run the SHOW CREATE DATABASE.

MySQL Checking for the newly created database
After running that command, MySQL returns the DB’s name, character set, and collation together, as shown in the image above.
Upon completion, you can now create tables and other database-related objects within the newly created foss_linux database.
You can now exit the Command line client using the “quit” command. This statement is useful when you want to quit and exit the MySQL program. To exit, type the exit command.
Those are the crucial steps you need to acquaint yourself to successfully create, query, manipulate, and edit data in a database.
This is one way one can use to create a database in MySQL. Another common method that we shall cover in this article is creating a database using MySQL workbench. Follow the steps mentioned below to create a database using MySQL workbench successfully.
Creating a database using the MySQL Workbench
There are two ways to create a database using MySQL workbench:
Method 1
First, launch the MySQL workbench application and click the button written “+” as displayed below to set up a new connection.
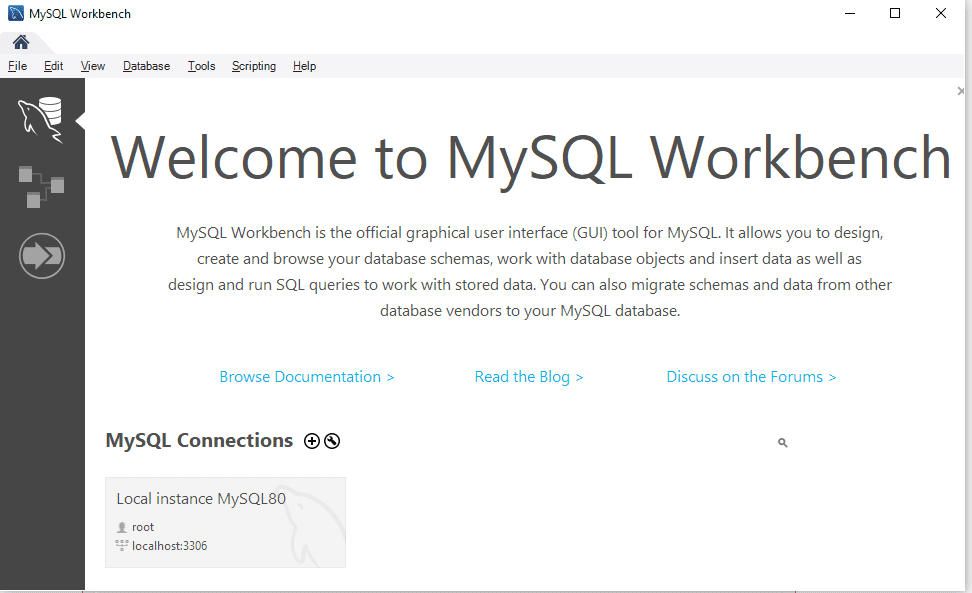
MySQL Workbench Screen
Secondly, type the name for the connections and then click the Test connection button.
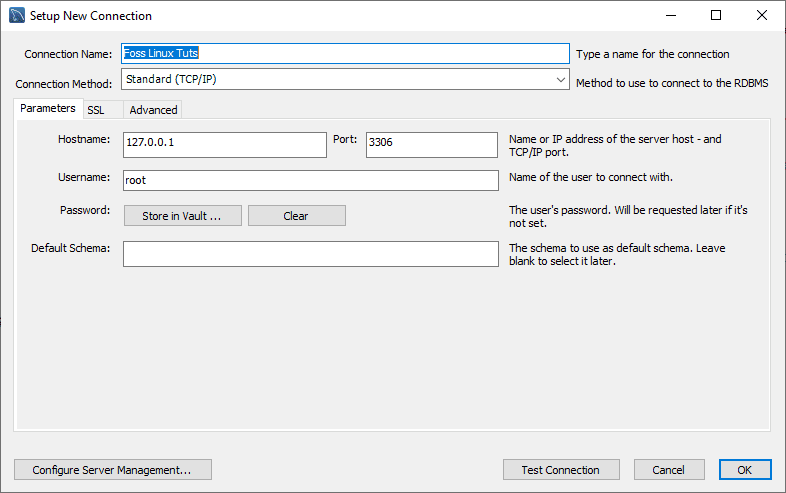
MySQL Set Connection Name
After clicking that button, the bench will run and display a dialog box that asks you to enter the password of the “root” user:
In this section, you need to first type in the password for the root user; after that, click the “check box” in the Save password in vault, then click the “OK” button at the bottom to proceed with the process.
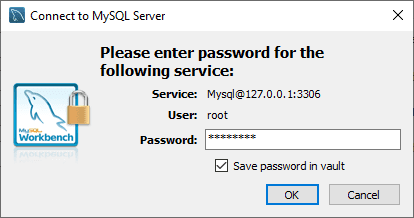
MySQL Enter Password to connect to MySQL Server
Once the previous step is complete, double-click the connection name “Foss Linux Tuts” to connect to the MySQL server, as seen in the sample below.

MySQL Click Foss Linux Tuts Connection name
After that, MySQL Workbench fires up with the following window containing four sections: Navigator, Query, Information, and output.
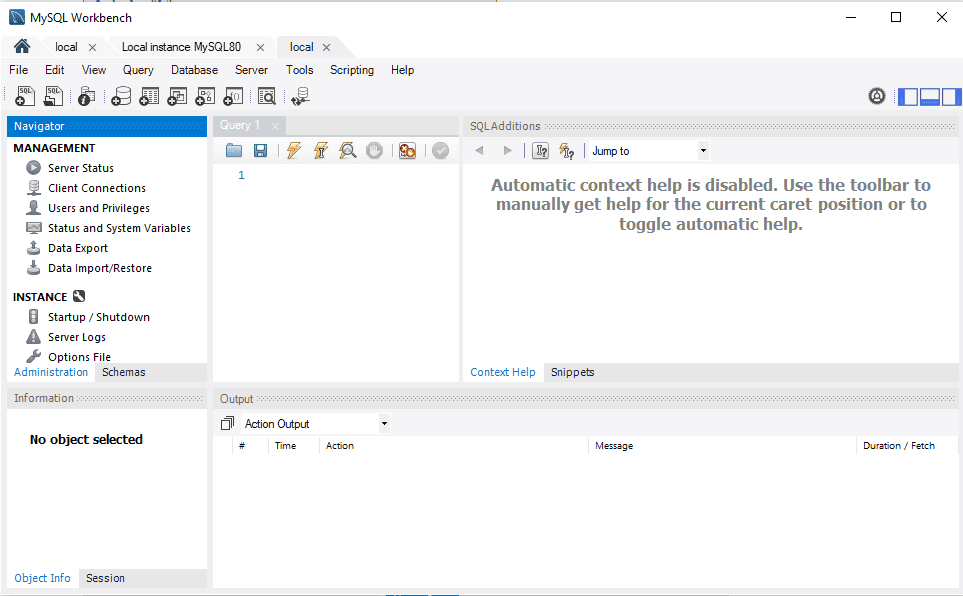
MySQL Query editor screen
Click on the “create a new schema in the connected server” button from the toolbar, as shown by the screenshot below.
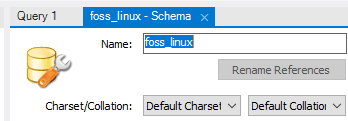
MySQL Create new schema foss_linux
Note: In MySQL, there are terms that you need to also acquaint yourself with, such as the schema, which in other words means database. So, when told to create a new schema, in other words, you are being told to create a new database.
The character set and collation are set by default as you create the database or schema; hence you don’t need to change anything. Once you are done, click the “Apply” button at the bottom of the window.
Additionally, a revert button is at the bottom that aids you in undoing all the specifications or settings you have accidentally made before setting up your database.

MySQL Revert button
After doing that, a window pops up on MySQL Workbench displaying the SQL script to be applied to the database. Note that the CREATE SCHEMA command is the same as the CREATE DATABASE statement. Therefore, you can use any that suits you to create the database.
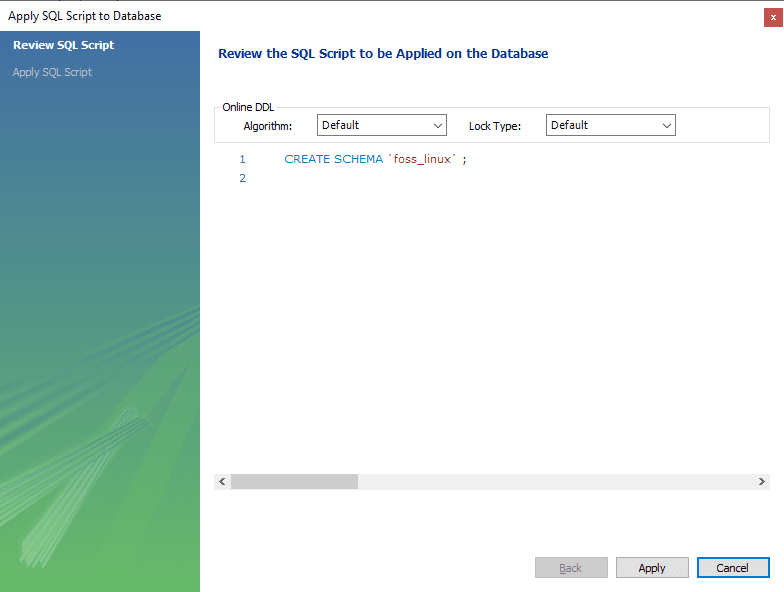
Once you are done, you will see the newly created database in the schemas tab.
Method 2:
To create a database with the name fosslinux_tuts, we shall use the following syntax:
CREATE SCHEMA fosslinux_tuts
Note: When using method 2, you have to execute the query using the first button after the save button.
This syntax will create a database “fosslinux_tuts.”

MySQL Create Schema fosslinux_tuts
Conclusion
We now hope you are fully acquainted with all you need to know about creating a database in MySQL using both methods (creating a database using MySQL program and creating a database using MySQL bench).
To sum it up, this tutorial has summarized how to create a new database from the MySQL program using the MySQL “CREATE DATABASE” statement and from MySQL workbench using the “CREATE SCHEMA” statement. In addition, the article has also partially covered the installation of MySQL on windows operating systems.
With the aid of this article tutorial, you can create a database from scratch using both the methods mentioned above. Have you ever tried using MySQL? Why and how do you feel when using it? Please share with us in the comment section below. Thanks for reading.

